控件
最后修改于 2023 年 1 月 10 日
在本节中,我们将介绍 wxPython 中的基本控件。每个控件都会有一个小的代码示例。控件是应用程序的基本构建块。 wxPython 具有各种控件,包括按钮、复选框、滑块和列表框。
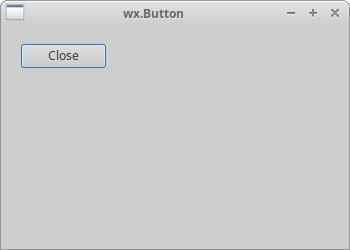
wx.Button
wx.Button 是一个简单的控件。它包含一个文本字符串。它用于触发一个动作。
#!/usr/bin/env python

"""
ZetCode wxPython tutorial

In this code example, we create a
button widget.

author: Jan Bodnar
website: www.zetcode.com
last modified: July 2020
"""

import wx


class Example(wx.Frame):

    def __init__(self, *args, **kw):
        super(Example, self).__init__(*args, **kw)

        self.InitUI()

    def InitUI(self):

        pnl = wx.Panel(self)
        closeButton = wx.Button(pnl, label='Close', pos=(20, 20))

        closeButton.Bind(wx.EVT_BUTTON, self.OnClose)

        self.SetSize((350, 250))
        self.SetTitle('wx.Button')
        self.Centre()

    def OnClose(self, e):

        self.Close(True)


def main():

    app = wx.App()
    ex = Example(None)
    ex.Show()
    app.MainLoop()


if __name__ == '__main__':
    main()
在代码示例中,我们创建一个关闭按钮,当按下时将终止应用程序。
cbtn = wx.Button(pnl, label='Close', pos=(20, 20))
创建了一个 wx.Button 控件。在控件的构造函数中,我们提供了按钮的标签和在面板上的位置。
cbtn.Bind(wx.EVT_BUTTON, self.OnClose)
当单击该按钮时,将触发 wx.EVT_BUTTON 事件。我们为该事件指定了事件处理程序。
def OnClose(self, e):

    self.Close(True)
在 OnClose() 方法中,我们使用 Close() 方法终止应用程序。
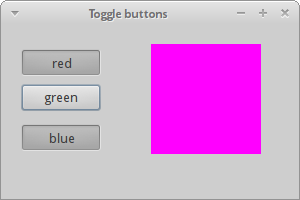
wx.ToggleButton
wx.ToggleButton 是一个有两个状态的按钮:按下和未按下。您可以通过单击在两种状态之间切换。在某些情况下,此功能非常适用。
#!/usr/bin/env python

"""
ZetCode wxPython tutorial

In this code example, we create three
toggle button widgets.

author: Jan Bodnar
website: www.zetcode.com
last modified: July 2020
"""

import wx


class Example(wx.Frame):

    def __init__(self, *args, **kw):
        super(Example, self).__init__(*args, **kw)

        self.InitUI()

    def InitUI(self):

        pnl = wx.Panel(self)

        self.col = wx.Colour(0, 0, 0)

        rtb = wx.ToggleButton(pnl, label='red', pos=(20, 25))
        gtb = wx.ToggleButton(pnl, label='green', pos=(20, 60))
        btb = wx.ToggleButton(pnl, label='blue', pos=(20, 100))

        self.cpnl  = wx.Panel(pnl, pos=(150, 20), size=(110, 110))
        self.cpnl.SetBackgroundColour(self.col)

        rtb.Bind(wx.EVT_TOGGLEBUTTON, self.ToggleRed)
        gtb.Bind(wx.EVT_TOGGLEBUTTON, self.ToggleGreen)
        btb.Bind(wx.EVT_TOGGLEBUTTON, self.ToggleBlue)

        self.SetSize((350, 250))
        self.SetTitle('Toggle buttons')
        self.Centre()

    def ToggleRed(self, e):

        obj = e.GetEventObject()
        isPressed = obj.GetValue()

        green = self.col.Green()
        blue = self.col.Blue()

        if isPressed:
            self.col.Set(255, green, blue)
        else:
            self.col.Set(0, green, blue)

        self.cpnl.SetBackgroundColour(self.col)
        self.cpnl.Refresh()

    def ToggleGreen(self, e):

        obj = e.GetEventObject()
        isPressed = obj.GetValue()

        red = self.col.Red()
        blue = self.col.Blue()

        if isPressed:
            self.col.Set(red, 255, blue)
        else:
            self.col.Set(red, 0, blue)

        self.cpnl.SetBackgroundColour(self.col)
        self.cpnl.Refresh()

    def ToggleBlue(self, e):

        obj = e.GetEventObject()
        isPressed = obj.GetValue()

        red = self.col.Red()
        green = self.col.Green()

        if isPressed:
            self.col.Set(red, green, 255)
        else:
            self.col.Set(red, green, 0)

        self.cpnl.SetBackgroundColour(self.col)
        self.cpnl.Refresh()


def main():

    app = wx.App()
    ex = Example(None)
    ex.Show()
    app.MainLoop()


if __name__ == '__main__':
    main()
我们有红色、绿色和蓝色切换按钮和一个面板。我们通过单击切换按钮来更改面板的颜色。
rtb = wx.ToggleButton(pnl, label='red', pos=(20, 25))
创建了一个 wx.ToggleButton 控件。
self.cpnl  = wx.Panel(pnl, pos=(150, 20), size=(110, 110))
self.cpnl.SetBackgroundColour(self.col)
这是一个面板,我们将使用切换按钮修改其颜色。
rtb.Bind(wx.EVT_TOGGLEBUTTON, self.ToggleRed)
当我们单击 rtb 切换按钮时,会调用 ToggleRed() 事件处理程序。
def ToggleRed(self, e):

    obj = e.GetEventObject()
    isPressed = obj.GetValue()

    green = self.col.Green()
    blue = self.col.Blue()

    if isPressed:
        self.col.Set(255, green, blue)
    else:
        self.col.Set(0, green, blue)

    self.cpnl.SetBackgroundColour(self.col)
在 ToggleRed() 方法中,我们对 rtb 按钮被按下的事实做出反应。我们计算出颜色部分并更新颜色面板的颜色。
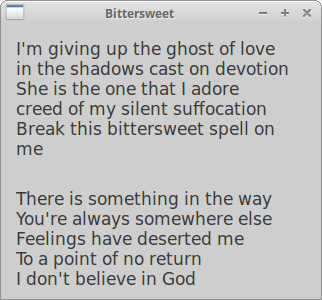
wx.StaticText
wx.StaticText 控件显示一行或多行只读文本。
#!/usr/bin/python

"""
ZetCode wxPython tutorial

In this code example, we create a static text.

author: Jan Bodnar
website: www.zetcode.com
last modified: July 2020
"""

import wx


class Example(wx.Frame):

    def __init__(self, *args, **kw):
        super(Example, self).__init__(*args, **kw)

        self.InitUI()

    def InitUI(self):

        txt1 = '''I'm giving up the ghost of love
in the shadows cast on devotion
She is the one that I adore
creed of my silent suffocation
Break this bittersweet spell on me
lost in the arms of destiny'''

        txt2 = '''There is something in the way
You're always somewhere else
Feelings have deserted me
To a point of no return
I don't believe in God
But I pray for you'''

        pnl = wx.Panel(self)
        vbox = wx.BoxSizer(wx.VERTICAL)

        font = wx.Font(13, wx.DEFAULT, wx.NORMAL, wx.DEFAULT)

        st1 = wx.StaticText(pnl, label=txt1, style=wx.ALIGN_LEFT)
        st2 = wx.StaticText(pnl, label=txt2, style=wx.ALIGN_LEFT)

        st1.SetFont(font)
        st2.SetFont(font)

        vbox.Add(st1, flag=wx.ALL, border=15)
        vbox.Add(st2, flag=wx.ALL, border=15)

        pnl.SetSizer(vbox)

        self.SetTitle('Bittersweet')
        self.Centre()


def main():

    app = wx.App()
    ex = Example(None)
    ex.Show()
    app.MainLoop()


if __name__ == '__main__':
    main()
在该示例中,我们使用 wx.StaticText 控件显示了 Bittersweet 歌曲的两段歌词。
font = wx.Font(13, wx.DEFAULT, wx.NORMAL, wx.DEFAULT)
我们为文本创建一个字体对象。
        txt1 = '''I'm giving up the ghost of love
in the shadows cast on devotion
She is the one that I adore
creed of my silent suffocation
Break this bittersweet spell on me
lost in the arms of destiny'''
这是要在 wx.StaticText 控件中显示的字符串。
st1 = wx.StaticText(pnl, label=txt1, style=wx.ALIGN_LEFT)
我们创建了 wx.StaticText 控件。文本将向左对齐。
st1.SetFont(font)
st2.SetFont(font)
我们使用 SetFont() 将字体设置为静态文本控件。
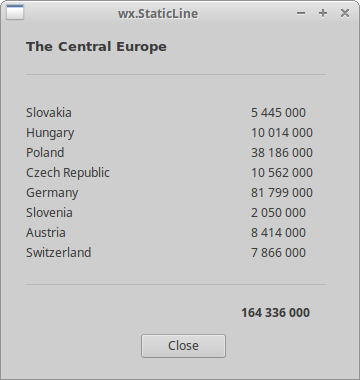
wx.StaticLine
此控件在窗口上显示一条简单的线。它可以是水平或垂直的。
#!/usr/bin/env python

"""
ZetCode wxPython tutorial

In this code example, we create a static line.

author: Jan Bodnar
website: www.zetcode.com
last modified: July 2020
"""


import wx


class Example(wx.Frame):

    def __init__(self, *args, **kw):
        super(Example, self).__init__(*args, **kw)

        self.InitUI()

    def InitUI(self):

        pnl = wx.Panel(self)

        font = wx.Font(10, wx.DEFAULT, wx.NORMAL, wx.BOLD)
        heading = wx.StaticText(self, label='The Central Europe',
                                pos=(25, 15), size=(200, -1))
        heading.SetFont(font)

        wx.StaticLine(self, pos=(25, 50), size=(300,1))

        wx.StaticText(self, label='Slovakia', pos=(25, 80))
        wx.StaticText(self, label='Hungary', pos=(25, 100))
        wx.StaticText(self, label='Poland', pos=(25, 120))
        wx.StaticText(self, label='Czech Republic', pos=(25, 140))
        wx.StaticText(self, label='Germany', pos=(25, 160))
        wx.StaticText(self, label='Slovenia', pos=(25, 180))
        wx.StaticText(self, label='Austria', pos=(25, 200))
        wx.StaticText(self, label='Switzerland', pos=(25, 220))

        wx.StaticText(self, label='5 445 000', pos=(250, 80))
        wx.StaticText(self, label='10 014 000', pos=(250, 100))
        wx.StaticText(self, label='38 186 000', pos=(250, 120))
        wx.StaticText(self, label='10 562 000', pos=(250, 140))
        wx.StaticText(self, label='81 799 000', pos=(250, 160))
        wx.StaticText(self, label='2 050 000', pos=(250, 180))
        wx.StaticText(self, label='8 414 000', pos=(250, 200))
        wx.StaticText(self, label='7 866 000', pos=(250, 220))

        wx.StaticLine(self, pos=(25, 260), size=(300,1))

        tsum = wx.StaticText(self, label='164 336 000', pos=(240, 280))
        sum_font = tsum.GetFont()
        sum_font.SetWeight(wx.BOLD)
        tsum.SetFont(sum_font)

        btn = wx.Button(self, label='Close', pos=(140, 310))

        btn.Bind(wx.EVT_BUTTON, self.OnClose)

        self.SetSize((360, 380))
        self.SetTitle('wx.StaticLine')
        self.Centre()

    def OnClose(self, e):

        self.Close(True)


def main():

    app = wx.App()
    ex = Example(None)
    ex.Show()
    app.MainLoop()


if __name__ == '__main__':
    main()
该脚本显示了中欧国家及其人口。 wx.StatLine 使其看起来更具视觉吸引力。
wx.StaticLine(self, pos=(25, 50), size=(300,1))
这是 wx.StaticLine 的构造函数
wx.StaticBox
这是一种装饰器控件。它用于逻辑地将各种控件分组。请注意,必须在它包含的控件之前创建此控件,并且这些控件应该是静态框的同级,而不是子级。
#!/usr/bin/python

import wx


class Example(wx.Frame):

    def __init__(self, *args, **kw):
        super(Example, self).__init__(*args, **kw)

        self.InitUI()

    def InitUI(self):

        pnl = wx.Panel(self)

        wx.StaticBox(pnl, label='Personal Info', pos=(5, 5), size=(240, 170))
        wx.CheckBox(pnl, label='Male', pos=(15, 30))
        wx.CheckBox(pnl, label='Married', pos=(15, 55))
        wx.StaticText(pnl, label='Age', pos=(15, 95))
        wx.SpinCtrl(pnl, value='1', pos=(55, 90), size=(60, -1), min=1, max=120)

        btn = wx.Button(pnl, label='Ok', pos=(90, 185), size=(60, -1))

        btn.Bind(wx.EVT_BUTTON, self.OnClose)

        self.SetSize((270, 250))
        self.SetTitle('Static box')
        self.Centre()
        self.Show(True)

    def OnClose(self, e):

        self.Close(True)


def main():

    ex = wx.App()
    Example(None)
    ex.MainLoop()


if __name__ == '__main__':
    main()
我们有一个 wx.StaticBox,它装饰了其他四个控件。

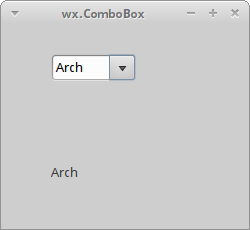
wx.ComboBox
wx.ComboBox 是一个单行文本字段、一个带有向下箭头图像的按钮和一个列表框的组合。当您按下按钮时,会出现一个列表框。用户只能从提供的字符串列表中选择一个选项。
#!/usr/bin/python

import wx


class Example(wx.Frame):

    def __init__(self, *args, **kw):
        super(Example, self).__init__(*args, **kw)

        self.InitUI()

    def InitUI(self):

        pnl = wx.Panel(self)

        distros = ['Ubuntu', 'Arch', 'Fedora', 'Debian', 'Mint']
        cb = wx.ComboBox(pnl, pos=(50, 30), choices=distros,
            style=wx.CB_READONLY)

        self.st = wx.StaticText(pnl, label='', pos=(50, 140))
        cb.Bind(wx.EVT_COMBOBOX, self.OnSelect)

        self.SetSize((250, 230))
        self.SetTitle('wx.ComboBox')
        self.Centre()
        self.Show(True)

    def OnSelect(self, e):

        i = e.GetString()
        self.st.SetLabel(i)

def main():

    ex = wx.App()
    Example(None)
    ex.MainLoop()

if __name__ == '__main__':
    main()
从组合框中选择的选项显示在下面的标签中。
distros = ['Ubuntu', 'Arch', 'Fedora', 'Debian', 'Mint']
组合框将包含此字符串列表。
cb = wx.ComboBox(pnl, pos=(50, 30), choices=distros,
            style=wx.CB_READONLY)
创建了一个 wx.ComboBox 控件。 choices 参数接受一个字符串列表,以供组合框显示。 wx.CB_READONLY 样式使列表的字符串只读。
cb.Bind(wx.EVT_COMBOBOX, self.OnSelect)
当我们从组合框中选择一个选项时,会触发 wx.EVT_COMBOBOX 事件。我们将 OnSelect() 事件处理程序插入到此事件中。
def OnSelect(self, e):

    i = e.GetString()
    self.st.SetLabel(i)
我们从组合框中获取选定的项目,并将其设置为标签。
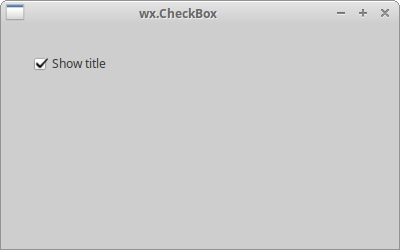
wx.CheckBox
wx.CheckBox 是一个具有两种状态的控件:开和关。它是一个带有标签的框。标签可以设置为框的右侧或左侧。如果选中了 wx.CheckBox,则在框中用一个勾号表示。
#!/usr/bin/env python

"""
ZetCode wxPython tutorial

In this example we create a checkbox widget.

author: Jan Bodnar
website: www.zetcode.com
last modified: July 2020
"""

import wx


class Example(wx.Frame):

    def __init__(self, *args, **kw):
        super(Example, self).__init__(*args, **kw)

        self.InitUI()

    def InitUI(self):

        pnl = wx.Panel(self)

        vbox = wx.BoxSizer(wx.HORIZONTAL)

        cb = wx.CheckBox(pnl, label='Show title')
        cb.SetValue(True)
        cb.Bind(wx.EVT_CHECKBOX, self.ShowOrHideTitle)

        vbox.Add(cb, flag=wx.TOP|wx.LEFT, border=30)

        pnl.SetSizer(vbox)

        self.SetTitle('wx.CheckBox')
        self.Centre()

    def ShowOrHideTitle(self, e):

        sender = e.GetEventObject()
        isChecked = sender.GetValue()

        if isChecked:
            self.SetTitle('wx.CheckBox')
        else:
            self.SetTitle('')


def main():

    app = wx.App()
    ex = Example(None)
    ex.Show()
    app.MainLoop()


if __name__ == '__main__':
    main()
在上面的例子中,我们使用 wx.CheckBox 控件显示或隐藏窗口标题。
cb = wx.CheckBox(pnl, label='Show title')
这是 wx.CheckBox 控件的构造函数。
cb.SetValue(True)
默认情况下会显示框架窗口的标题,因此我们使用 SetValue() 方法选中 wx.CheckBox 控件。
cb.Bind(wx.EVT_CHECKBOX, self.ShowOrHideTitle)
当我们单击 wx.CheckBox 控件时,会触发 wx.EVT_CHECKBOX 事件。在这种事件上会调用 ShowOrHideTitle() 事件处理程序。
def ShowOrHideTitle(self, e):

    sender = e.GetEventObject()
    isChecked = sender.GetValue()

    if isChecked:
        self.SetTitle('wx.CheckBox')
    else:
        self.SetTitle('')
在 ShowOrHideTitle() 方法中,我们根据 wx.CheckBox 控件的状态显示或隐藏标题。
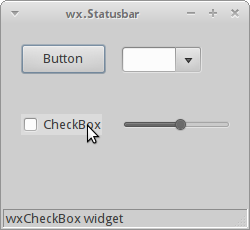
wx.StatusBar
wx.StatusBar 控件用于显示应用程序状态信息。它可以分成几个部分来显示不同类型的信息。我们可以在 wx.StatusBar 中插入其他控件。它可以作为对话框的替代方案,因为对话框经常被滥用,并且大多数用户都不喜欢它们。我们可以通过两种方式创建 wx.StatusBar。我们可以手动创建我们自己的 wx.StatusBar 并调用 SetStatusBar() 方法,或者我们可以简单地调用 CreateStatusBar() 方法。后一种方法为我们创建了一个默认的 wx.StatusBar。
#!/usr/bin/python

import wx


class Example(wx.Frame):

    def __init__(self, *args, **kw):
        super(Example, self).__init__(*args, **kw)

        self.InitUI()

    def InitUI(self):

        pnl = wx.Panel(self)

        button = wx.Button(pnl, label='Button', pos=(20, 20))
        text = wx.CheckBox(pnl, label='CheckBox', pos=(20, 90))
        combo = wx.ComboBox(pnl, pos=(120, 22), choices=['Python', 'Ruby'])
        slider = wx.Slider(pnl, 5, 6, 1, 10, (120, 90), (110, -1))

        pnl.Bind(wx.EVT_ENTER_WINDOW, self.OnWidgetEnter)
        button.Bind(wx.EVT_ENTER_WINDOW, self.OnWidgetEnter)
        text.Bind(wx.EVT_ENTER_WINDOW, self.OnWidgetEnter)
        combo.Bind(wx.EVT_ENTER_WINDOW, self.OnWidgetEnter)
        slider.Bind(wx.EVT_ENTER_WINDOW, self.OnWidgetEnter)

        self.sb = self.CreateStatusBar()

        self.SetSize((250, 230))
        self.SetTitle('wx.Statusbar')
        self.Centre()
        self.Show(True)

    def OnWidgetEnter(self, e):

        name = e.GetEventObject().GetClassName()
        self.sb.SetStatusText(name + ' widget')
        e.Skip()

def main():

    ex = wx.App()
    Example(None)
    ex.MainLoop()

if __name__ == '__main__':
    main()
在我们的示例中,我们有一个 wx.Frame 控件和其他五个控件。如果我们将鼠标指针悬停在某个控件上,则其名称将显示在 wx.StatusBar 中。
pnl.Bind(wx.EVT_ENTER_WINDOW, self.OnWidgetEnter)
如果我们进入一个控件的区域,则会生成 EVT_ENTER_WINDOW 事件。
self.sb = self.CreateStatusBar()
使用 CreateStatusBar() 方法创建状态栏。
def OnWidgetEnter(self, e):

    name = e.GetEventObject().GetClassName()
    self.sb.SetStatusText(name + ' widget')
    e.Skip()
在 OnWidgetEnter() 方法中,我们计算出我们用鼠标指针进入的控件的名称。我们使用 SetStatusText() 方法设置状态文本。
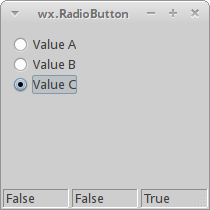
wx.RadioButton
wx.RadioButton 是一个控件,它允许用户从一组选项中选择一个独占选择。一组单选按钮通过将组中的第一个单选按钮包含 wx.RB_GROUP 样式来定义。在该样式标志之后定义的第一个单选按钮的所有其他单选按钮都将添加到第一个单选按钮的函数组中。使用 wx.RB_GROUP 标志声明另一个单选按钮将启动一个新的单选按钮组。
#!/usr/bin/python

import wx


class Example(wx.Frame):

    def __init__(self, *args, **kw):
        super(Example, self).__init__(*args, **kw)

        self.InitUI()

    def InitUI(self):

        pnl = wx.Panel(self)

        self.rb1 = wx.RadioButton(pnl, label='Value A', pos=(10, 10),
            style=wx.RB_GROUP)
        self.rb2 = wx.RadioButton(pnl, label='Value B', pos=(10, 30))
        self.rb3 = wx.RadioButton(pnl, label='Value C', pos=(10, 50))

        self.rb1.Bind(wx.EVT_RADIOBUTTON, self.SetVal)
        self.rb2.Bind(wx.EVT_RADIOBUTTON, self.SetVal)
        self.rb3.Bind(wx.EVT_RADIOBUTTON, self.SetVal)

        self.sb = self.CreateStatusBar(3)

        self.sb.SetStatusText("True", 0)
        self.sb.SetStatusText("False", 1)
        self.sb.SetStatusText("False", 2)

        self.SetSize((210, 210))
        self.SetTitle('wx.RadioButton')
        self.Centre()
        self.Show(True)

    def SetVal(self, e):

        state1 = str(self.rb1.GetValue())
        state2 = str(self.rb2.GetValue())
        state3 = str(self.rb3.GetValue())

        self.sb.SetStatusText(state1, 0)
        self.sb.SetStatusText(state2, 1)
        self.sb.SetStatusText(state3, 2)

def main():

    ex = wx.App()
    Example(None)
    ex.MainLoop()

if __name__ == '__main__':
    main()
我们有三个单选按钮组成的一组。每个单选按钮的状态都显示在状态栏中。
self.rb1 = wx.RadioButton(pnl, label='Value A', pos=(10, 10),
    style=wx.RB_GROUP)
self.rb2 = wx.RadioButton(pnl, label='Value B', pos=(10, 30))
self.rb3 = wx.RadioButton(pnl, label='Value C', pos=(10, 50))
我们创建了三个单选按钮。第一个单选按钮设置了 wx.RB_GROUP 样式。它启动一个新的单选组。
self.rb1.Bind(wx.EVT_RADIOBUTTON, self.SetVal)
我们将 wx.EVT_RADIOBUTTON 事件绑定到 SetVal() 事件处理程序。
self.sb = self.CreateStatusBar(3)

self.sb.SetStatusText("True", 0)
self.sb.SetStatusText("False", 1)
self.sb.SetStatusText("False", 2)
我们创建了一个具有三个字段的状态栏。我们将初始文本设置为状态栏,对应于单选按钮状态。
def SetVal(self, e):

    state1 = str(self.rb1.GetValue())
    state2 = str(self.rb2.GetValue())
    state3 = str(self.rb3.GetValue())

    self.sb.SetStatusText(state1, 0)
    self.sb.SetStatusText(state2, 1)
    self.sb.SetStatusText(state3, 2)
在 SetVal() 方法中,我们找出单选按钮的状态。我们将状态栏字段更新为当前的单选按钮值。
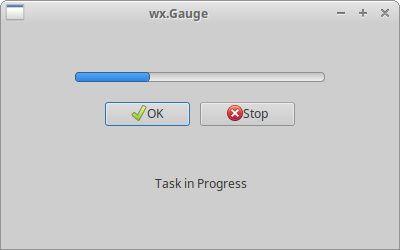
wx.Gauge
wx.Gauge 是一个控件,用于处理冗长的任务。它有一个指示器来显示任务的当前状态。
#!/usr/bin/env python

"""
ZetCode wxPython tutorial

In this example we create gauge widget.

author: Jan Bodnar
website: www.zetcode.com
last modified: July 2020
"""

import wx

TASK_RANGE = 50

class Example(wx.Frame):

    def __init__(self, *args, **kw):
        super(Example, self).__init__(*args, **kw)

        self.InitUI()

    def InitUI(self):

        self.timer = wx.Timer(self, 1)
        self.count = 0

        self.Bind(wx.EVT_TIMER, self.OnTimer, self.timer)

        pnl = wx.Panel(self)
        vbox = wx.BoxSizer(wx.VERTICAL)
        hbox1 = wx.BoxSizer(wx.HORIZONTAL)
        hbox2 = wx.BoxSizer(wx.HORIZONTAL)
        hbox3 = wx.BoxSizer(wx.HORIZONTAL)

        self.gauge = wx.Gauge(pnl, range=TASK_RANGE, size=(250, -1))
        self.btn1 = wx.Button(pnl, wx.ID_OK)
        self.btn2 = wx.Button(pnl, wx.ID_STOP)
        self.text = wx.StaticText(pnl, label='Task to be done')

        self.Bind(wx.EVT_BUTTON, self.OnOk, self.btn1)
        self.Bind(wx.EVT_BUTTON, self.OnStop, self.btn2)

        hbox1.Add(self.gauge, proportion=1, flag=wx.ALIGN_CENTRE)
        hbox2.Add(self.btn1, proportion=1, flag=wx.RIGHT, border=10)
        hbox2.Add(self.btn2, proportion=1)
        hbox3.Add(self.text, proportion=1)

        vbox.Add((0, 30))

        vbox.Add(hbox1, flag=wx.ALIGN_CENTRE)

        vbox.Add((0, 20))

        vbox.Add(hbox2, proportion=1, flag=wx.ALIGN_CENTRE)
        vbox.Add(hbox3, proportion=1, flag=wx.ALIGN_CENTRE)

        pnl.SetSizer(vbox)

        self.SetTitle('wx.Gauge')
        self.Centre()

    def OnOk(self, e):

        if self.count >= TASK_RANGE:
            return

        self.timer.Start(100)
        self.text.SetLabel('Task in Progress')

    def OnStop(self, e):

        if self.count == 0 or self.count >= TASK_RANGE or not self.timer.IsRunning():
            return

        self.timer.Stop()
        self.text.SetLabel('Task Interrupted')

    def OnTimer(self, e):

        self.count = self.count + 1
        self.gauge.SetValue(self.count)

        if self.count == TASK_RANGE:

            self.timer.Stop()
            self.text.SetLabel('Task Completed')


def main():

    app = wx.App()
    ex = Example(None)
    ex.Show()
    app.MainLoop()


if __name__ == '__main__':
    main()
我们有一个量规和两个按钮。一个按钮启动量规,另一个按钮停止量规。
self.timer = wx.Timer(self, 1)
self.count = 0
我们使用 wx.Timer 在特定的时间间隔执行代码。我们将在那些时刻更新量规。 count 变量用于确定已经完成的任务的一部分。
self.gauge = wx.Gauge(pnl, range=TASK_RANGE, size=(250, -1))
这是 wx.Gauge 控件的构造函数。 range 参数设置控件的最大整数值。
def OnOk(self, e):

    if self.count >= TASK_RANGE:
        return

    self.timer.Start(100)
    self.text.SetLabel('Task in Progress')
当我们单击 OK 按钮时,将调用 OnOk() 方法。我们首先检查 count 变量是否在任务的范围内。如果不是,我们从该方法返回。如果任务尚未完成,我们启动计时器并更新静态文本。
def OnStop(self, e):

    if self.count == 0 or self.count >= TASK_RANGE or not self.timer.IsRunning():
        return

    self.timer.Stop()
    self.text.SetLabel('Task Interrupted')
当我们单击 Stop 按钮时,会调用 OnStop() 方法。我们检查停止任务的条件。如果我们满足了这些条件,我们将停止计时器并更新静态文本。
def OnTimer(self, e):

    self.count = self.count + 1
    self.gauge.SetValue(self.count)

    if self.count == TASK_RANGE:

        self.timer.Stop()
        self.text.SetLabel('Task Completed')
启动计时器后,会定期调用 OnTimer() 方法。在该方法中,我们更新 count 变量和量规控件。如果 count 变量等于 TASK_RANGE,我们将停止计时器并更新静态文本。
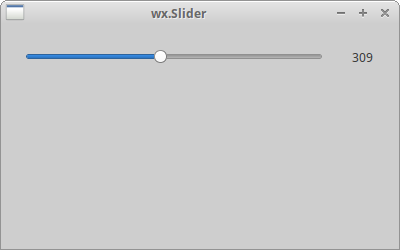
wx.Slider
wx.Slider 是一个具有简单手柄的控件。此手柄可以前后拉动。通过这种方式,我们可以选择一个特定的任务。
#!/usr/bin/env python

"""
ZetCode wxPython tutorial

In this example we create slider control.

author: Jan Bodnar
website: www.zetcode.com
last modified: July 2020
"""

import wx


class Example(wx.Frame):

    def __init__(self, *args, **kw):
        super(Example, self).__init__(*args, **kw)

        self.InitUI()

    def InitUI(self):

        pnl = wx.Panel(self)

        sizer = wx.GridBagSizer(5, 5)

        sld = wx.Slider(pnl, value=200, minValue=150, maxValue=500,
                        style=wx.SL_HORIZONTAL)

        sld.Bind(wx.EVT_SCROLL, self.OnSliderScroll)
        sizer.Add(sld, pos=(0, 0), flag=wx.ALL|wx.EXPAND, border=25)

        self.txt = wx.StaticText(pnl, label='200')
        sizer.Add(self.txt, pos=(0, 1), flag=wx.TOP|wx.RIGHT, border=25)

        sizer.AddGrowableCol(0)
        pnl.SetSizer(sizer)

        self.SetTitle('wx.Slider')
        self.Centre()

    def OnSliderScroll(self, e):

        obj = e.GetEventObject()
        val = obj.GetValue()

        self.txt.SetLabel(str(val))


def main():

    app = wx.App()
    ex = Example(None)
    ex.Show()
    app.MainLoop()


if __name__ == '__main__':
    main()
在滑块中选择的值显示在静态文本中。
sld = wx.Slider(pnl, value=200, minValue=150, maxValue=500,
                style=wx.SL_HORIZONTAL)
创建了 wx.Slider。我们使用 value 参数提供了滑块的初始位置,并使用 minValue 和 maxValue 参数提供了滑块的最小和最大位置。 wx.SL_HORIZONTAL 使滑块为水平。
sld.Bind(wx.EVT_SCROLL, self.OnSliderScroll)
遇到 wx.EVT_SCROLL 事件时,将调用 OnSliderScroll() 方法。
self.txt = wx.StaticText(pnl, label='200')
当前选择的滑块值显示在静态文本中,我们将其放置在滑块下方。
def OnSliderScroll(self, e):

    obj = e.GetEventObject()
    val = obj.GetValue()

    self.txt.SetLabel(str(val))
在 OnSliderScroll() 方法中,我们获取事件的发送者。我们获取滑块的当前值并将其设置为静态文本。
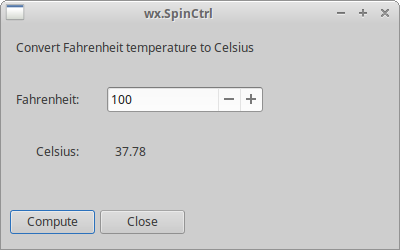
wx.SpinCtrl
wx.SpinCtrl 控件允许我们递增和递减一个值。
#!/usr/bin/env python

"""
ZetCode wxPython tutorial

In this example we create spin control.

author: Jan Bodnar
website: www.zetcode.com
last modified: July 2020
"""

import wx


class Example(wx.Frame):

    def __init__(self, *args, **kw):
        super(Example, self).__init__(*args, **kw)

        self.InitUI()

    def InitUI(self):

        pnl = wx.Panel(self)

        sizer = wx.GridBagSizer(5, 5)

        st1 = wx.StaticText(pnl, label='Convert Fahrenheit temperature to Celsius')
        sizer.Add(st1, pos=(0, 0), span=(1, 2), flag=wx.ALL, border=15)

        st2 = wx.StaticText(pnl, label='Fahrenheit:')
        sizer.Add(st2, pos=(1, 0), flag=wx.ALL | wx.ALIGN_CENTER, border=15)

        self.sc = wx.SpinCtrl(pnl, value='0')
        self.sc.SetRange(-459, 1000)

        sizer.Add(self.sc, pos=(1, 1), flag=wx.ALIGN_CENTER)

        st3 = wx.StaticText(pnl, label='Celsius:')
        sizer.Add(st3, pos=(2, 0), flag=wx.ALL|wx.ALIGN_RIGHT, border=15)

        self.celsius = wx.StaticText(pnl, label='')
        sizer.Add(self.celsius, pos=(2, 1), flag=wx.ALL, border=15)

        computeButton = wx.Button(pnl, label='Compute')
        computeButton.SetFocus()
        sizer.Add(computeButton, pos=(3, 0), flag=wx.ALIGN_RIGHT|wx.TOP, border=30)

        closeButton = wx.Button(pnl, label='Close')
        sizer.Add(closeButton, pos=(3, 1), flag=wx.ALIGN_LEFT|wx.TOP, border=30)

        computeButton.Bind(wx.EVT_BUTTON, self.OnCompute)
        closeButton.Bind(wx.EVT_BUTTON, self.OnClose)

        pnl.SetSizer(sizer)

        self.SetTitle('wx.SpinCtrl')
        self.Centre()

    def OnClose(self, e):

        self.Close(True)

    def OnCompute(self, e):

        fahr = self.sc.GetValue()
        cels = round((fahr - 32) * 5 / 9.0, 2)
        self.celsius.SetLabel(str(cels))


def main():

    app = wx.App()
    ex = Example(None)
    ex.Show()
    app.MainLoop()


if __name__ == '__main__':
    main()
该脚本将华氏温度转换为摄氏温度。我们使用 wx.SpinCtrl 控件为华氏温度选择一个值。
self.sc = wx.SpinCtrl(pnl, value='0')
self.sc.SetRange(-459, 1000)
我们创建了一个 wx.SpinCtrl 控件,初始值为 0。 SetRange() 为控件设置一个值范围。
def OnCompute(self, e):

    fahr = self.sc.GetValue()
    cels = round((fahr - 32) * 5 / 9.0, 2)
    self.celsius.SetLabel(str(cels))
当我们单击计算按钮时,将调用 OnCompute() 方法。在该方法的主体中,我们从旋转控件中获取当前值。我们计算摄氏温度,并将计算出的温度设置为静态文本控件。
wxPython 教程的这一部分专门介绍了核心 wxPython 控件。