PyQt QCheckBox
最后修改于 2023 年 8 月 24 日
在本文中,我们将展示如何使用 QCheckBox 小部件。
PyQt QCheckBox
QCheckBox 是一个具有两种状态的小部件:开和关。它是一个带标签的方框。复选框通常用于表示应用程序中可以启用或禁用的功能。
要创建互斥的复选框,我们可以使用 QButtonGroup。通过 setTristate 函数,我们可以将 QCheckBox 更改为具有三种状态。这可用于我们希望有额外中立选项的情况。
每当复选框被选中或清除时,都会发出 stateChanged 信号。
QCheckBox 示例
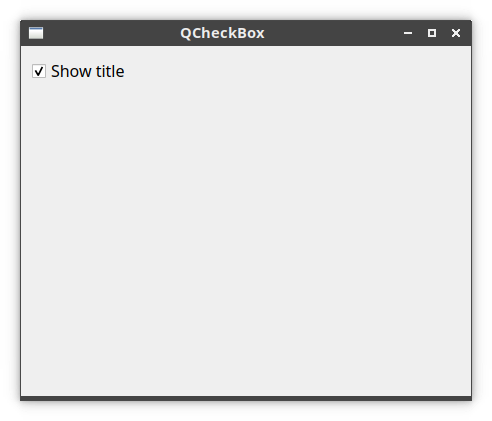
以下示例使用 QCheckBox 来切换窗口标题。
#!/usr/bin/python

from PyQt6.QtWidgets import QWidget, QCheckBox, QVBoxLayout, QApplication
from PyQt6.QtCore import Qt
import sys


class Example(QWidget):

    def __init__(self):
        super().__init__()

        self.initUI()

    def initUI(self):

        vbox = QVBoxLayout()

        cb = QCheckBox('Show title', self)
        cb.toggle()
        cb.stateChanged.connect(self.changeTitle)

        vbox.addWidget(cb)
        vbox.addStretch()

        self.setLayout(vbox)

        self.setGeometry(400, 300, 450, 350)
        self.setWindowTitle('QCheckBox')
        self.show()

    def changeTitle(self, state):

        if state == Qt.CheckState.Checked.value:
            self.setWindowTitle('QCheckBox')
        else:
            self.setWindowTitle(' ')


def main():

    app = QApplication(sys.argv)
    ex = Example()
    sys.exit(app.exec())


if __name__ == '__main__':
    main()
在此示例中,我们创建了一个用于切换窗口标题的复选框。
cb = QCheckBox('Show title', self)
这是一个 QCheckBox 构造函数。
cb.toggle()
由于标题在开始时是可见的,我们用 toggle 选中该复选框。
cb.stateChanged.connect(self.changeTitle)
我们将用户定义的 changeTitle 函数连接到 stateChanged 信号。changeTitle 函数用于切换窗口标题。
def changeTitle(self, state):

    if state == Qt.CheckState.Checked.value:
        self.setWindowTitle('QCheckBox')
    else:
        self.setWindowTitle(' ')
小部件的状态通过 state 变量传递给 changeTitle 函数。如果小部件被选中,我们设置一个窗口标题。否则,我们将标题栏设置为空字符串。
三态 QCheckBox
下一个示例演示了三态 QCheckBox。
#!/usr/bin/python

from PyQt6.QtWidgets import (QWidget, QCheckBox, QApplication,
                             QHBoxLayout, QLabel)
from PyQt6.QtCore import Qt
import sys


class Example(QWidget):

    def __init__(self):
        super().__init__()

        self.initUI()

    def initUI(self):

        hbox = QHBoxLayout()

        checkBox = QCheckBox('Increase taxes', self)
        checkBox.setTristate(True)
        hbox.addWidget(checkBox)

        checkBox.stateChanged.connect(self.changeTitle)

        self.label = QLabel('Negative viewpoint')
        hbox.addSpacing(20)
        hbox.addWidget(self.label)

        self.setLayout(hbox)

        self.move(300, 300)
        self.setWindowTitle('QCheckBox')
        self.show()

    def changeTitle(self, state):

        if state == Qt.CheckState.Checked.value:
            self.label.setText('Positive viewpoint')
        elif state == Qt.CheckState.Unchecked.value:
            self.label.setText('Negative viewpoint')
        else:
            self.label.setText('Neutral viewpoint')


def main():

    app = QApplication(sys.argv)
    ex = Example()
    sys.exit(app.exec())


if __name__ == '__main__':
    main()
我们有一个标签为“增加税收”的 QCheckBox。通过点击该复选框,我们可以显示积极、消极或中立的观点。
checkBox = QCheckBox('Increase taxes', self)
checkBox.setTristate(True)
我们创建一个 QCheckBox,并使用 setTristate 使其具有三种状态。

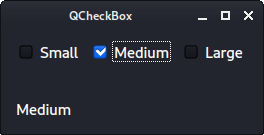
互斥 QCheckBox
借助 QButtonGroup,我们可以使复选框互斥;也就是说,一次只能选中一个复选框。
#!/usr/bin/python

from PyQt6.QtWidgets import (QWidget, QCheckBox, QApplication,
                             QHBoxLayout, QVBoxLayout, QLabel, QButtonGroup)
import sys


class Example(QWidget):

    def __init__(self):
        super().__init__()

        self.initUI()

    def initUI(self):

        vbox = QVBoxLayout()
        hbox = QHBoxLayout()

        checkBox1 = QCheckBox('Small', self)
        checkBox2 = QCheckBox('Medium', self)
        checkBox3 = QCheckBox('Large', self)

        group = QButtonGroup(self)
        group.addButton(checkBox1)
        group.addButton(checkBox2)
        group.addButton(checkBox3)

        hbox.addWidget(checkBox1)
        hbox.addWidget(checkBox2)
        hbox.addWidget(checkBox3)

        group.buttonClicked.connect(self.changeText)

        self.label = QLabel('...', self)

        vbox.addLayout(hbox)
        vbox.addSpacing(30)
        vbox.addWidget(self.label)

        self.setLayout(vbox)

        self.setGeometry(400, 300, 350, 300)
        self.setWindowTitle('QCheckBox')
        self.show()

    def changeText(self, btn):

        self.label.setText(btn.text())


def main():

    app = QApplication(sys.argv)
    ex = Example()
    sys.exit(app.exec())


if __name__ == '__main__':
    main()
我们有三个复选框,分别代表小、中、大尺寸。
group = QButtonGroup(self)
group.addButton(checkBox1)
group.addButton(checkBox2)
group.addButton(checkBox3)
我们使用 addButton 将这三个复选框放入 QButtonGroup 中。
group.buttonClicked.connect(self.changeText)
我们对 buttonClicked 信号做出反应。
def changeText(self, btn):

    self.label.setText(btn.text())
点击任何一个复选框后,我们获取其文本并更新标签。
在本文中,我们介绍了 PyQt 的 QCheckBox 小部件。
作者
列出所有 PyQt 教程。