wxWidgets 中的设备上下文
最后修改于 2023 年 10 月 18 日
GDI (图形设备接口) 是一个用于处理图形的接口。它用于与图形设备(如显示器、打印机或文件)进行交互。GDI 允许程序员在屏幕或打印机上显示数据,而无需关心特定设备的细节。GDI 将程序员与硬件隔离。
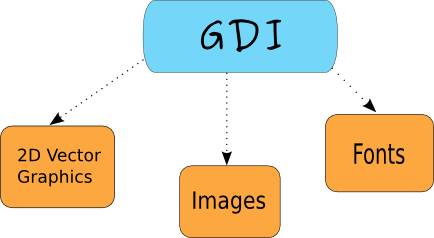
从程序员的角度来看,GDI 是一组用于处理图形的类和方法。GDI 由 2D 矢量图形、字体和图像组成。
要开始绘制图形,我们必须创建一个设备上下文 (DC) 对象。在 wxWidgets 中,设备上下文被称为 wxDC。文档将 wxDC 定义为可以绘制图形和文本的设备上下文。它以通用方式表示许多设备。同一段代码可以写入不同类型的设备。无论是屏幕还是打印机。wxDC 并非旨在直接使用。相反,程序员应该选择其中一个派生类。每个派生类都旨在在特定条件下使用。
以下类是 wxDC 的派生类
wxBufferedDCwxBufferedPaintDCwxPostScriptDCwxMemoryDCwxPrinterDCwxScreenDCwxClientDCwxPaintDCwxWindowDC
wxScreenDC 用于在屏幕上的任何位置绘制。如果我们要绘制整个窗口(仅限 Windows),则使用 wxWindowDC。这包括窗口装饰。wxClientDC 用于在窗口的客户区上绘制。客户区是窗口的区域,没有其装饰(标题和边框)。wxPaintDC 也用于在客户区上绘制。但是 wxPaintDC 和 wxClientDC 之间有一个区别。wxPaintDC 应该仅从 wxPaintEvent 使用。wxClientDC 不应从 wxPaintEvent 使用。wxMemoryDC 用于在位图上绘制图形。wxPostScriptDC 用于在任何平台上写入 PostScript 文件。wxPrinterDC 用于访问打印机(仅限 Windows)。
简单线条
我们从绘制一条线开始。
#include <wx/wx.h>

class Line : public wxFrame
{
public:
    Line(const wxString& title);

    void OnPaint(wxPaintEvent& event);

};
#include "line.h"


Line::Line(const wxString& title)
       : wxFrame(NULL, wxID_ANY, title, wxDefaultPosition, wxSize(280, 180))
{
  this->Connect(wxEVT_PAINT, wxPaintEventHandler(Line::OnPaint));
  this->Centre();
}

void Line::OnPaint(wxPaintEvent& event)
{
  wxPaintDC dc(this);

  wxCoord x1 = 50, y1 = 60;
  wxCoord x2 = 190, y2 = 60;

  dc.DrawLine(x1, y1, x2, y2);
}
#include <wx/wx.h>

class MyApp : public wxApp
{
  public:
    virtual bool OnInit();
};
#include "main.h"
#include "line.h"

IMPLEMENT_APP(MyApp)

bool MyApp::OnInit()
{

    Line *line = new Line(wxT("Line"));
    line->Show(true);

    return true;
}
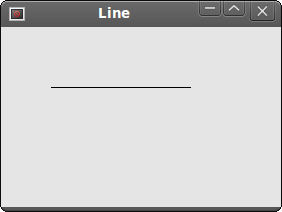
在我们的示例中,我们在窗口的客户区上绘制一条简单的线。如果我们调整窗口大小,它将被重绘。将生成一个 wxPaintEvent。并且该线将被再次绘制。
void OnPaint(wxPaintEvent& event);
在这里,我们声明一个 OnPaint 事件处理程序函数。
this->Connect(wxEVT_PAINT, wxPaintEventHandler(Line::OnPaint));
我们将一个绘图事件连接到 OnPaint 方法。所有绘图都发生在 OnPaint 事件处理程序内部。
wxPaintDC dc(this);
我们定义一个 wxPaintDC 设备上下文。它是一个设备上下文,用于在 wxPaintEvent 内部的窗口上绘制
wxCoord x1 = 50, y1 = 60;
wxCoord x2 = 190, y2 = 60;
我们定义四个坐标。
dc.DrawLine(x1, y1, x2, y2);
我们通过调用 DrawLine 方法绘制一条简单的线。
绘制文本
在窗口上绘制一些文本很容易。
#include <wx/wx.h>

class Text : public wxFrame
{
public:
    Text(const wxString & title);

    void OnPaint(wxPaintEvent & event);

};
#include "text.h"


Text::Text(const wxString& title)
       : wxFrame(NULL, wxID_ANY, title, wxDefaultPosition, wxSize(250, 150))
{
  Connect(wxEVT_PAINT, wxPaintEventHandler(Text::OnPaint));
  Centre();
}

void Text::OnPaint(wxPaintEvent& event)
{
  wxPaintDC dc(this);

  dc.DrawText(wxT("Лев Николaевич Толстoй"), 40, 60);
  dc.DrawText(wxT("Анна Каренина"), 70, 80);
}
#include <wx/wx.h>

class MyApp : public wxApp
{
  public:
    virtual bool OnInit();
};
#include "main.h"
#include "text.h"

IMPLEMENT_APP(MyApp)

bool MyApp::OnInit()
{

    Text *text = new Text(wxT("Text"));
    text->Show(true);

    return true;
}
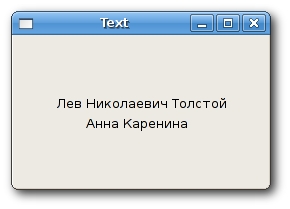
在我们的示例中,我们在窗口上绘制文本 Lev Nikolayevich Tolstoy, Anna Karenina,使用俄语字母 azbuka。
dc.DrawText(wxT("Лев Николaевич Толстoй"), 40, 60);
dc.DrawText(wxT("Анна Каренина"), 70, 80);
DrawText 方法在窗口上绘制文本。它使用当前的文本字体以及当前的文本前景色和背景色,在指定点绘制文本字符串。由于使用了 wxT 宏,我们可以在代码中直接使用 azbuka。wxT 宏与 _T 宏相同。它包装字符串字面量以供使用,无论是否使用 Unicode。当未启用 Unicode 时,wxT 是一个空宏。当启用 Unicode 时,它会为字符串字面量添加必要的 L,使其成为宽字符字符串常量。
点
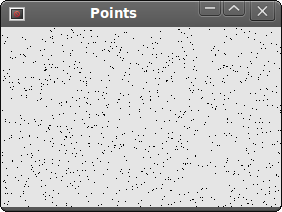
最简单的几何对象是一个点。它在窗口上只是一个点。
DrawPoint(int x, int y)
此方法在 x、y 坐标处绘制一个点。
#include <wx/wx.h>

class Points : public wxFrame
{
public:
    Points(const wxString & title);

    void OnPaint(wxPaintEvent & event);

};
#include "points.h"
#include <stdlib.h>
#include <time.h>


Points::Points(const wxString& title)
       : wxFrame(NULL, wxID_ANY, title, wxDefaultPosition, wxSize(280, 180))
{

  this->Connect(wxEVT_PAINT, wxPaintEventHandler(Points::OnPaint));
  srand(time(NULL));
  this->Centre();
}

void Points::OnPaint(wxPaintEvent & event)
{
  wxPaintDC dc(this);

  wxCoord x = 0;
  wxCoord y = 0;

  wxSize size = this->GetSize();

  for (int i = 0; i<1000; i++) {
      x = rand() % size.x + 1;
      y = rand() % size.y + 1;
      dc.DrawPoint(x, y);
  }
}
#include <wx/wx.h>

class MyApp : public wxApp
{
  public:
    virtual bool OnInit();
};
#include "main.h"
#include "points.h"

IMPLEMENT_APP(MyApp)

bool MyApp::OnInit()
{

    Points *points = new Points(wxT("Points"));
    points->Show(true);

    return true;
}
单个点可能难以看到。因此我们创建了 1000 个点。每次调整窗口大小时,我们都会在窗口的客户区上绘制 1000 个点。
wxSize size = this->GetSize();
在这里,我们获取窗口的大小。
x = rand() % size.x + 1;
在这里,我们获得一个介于 1 到 size.x 之间的随机数。
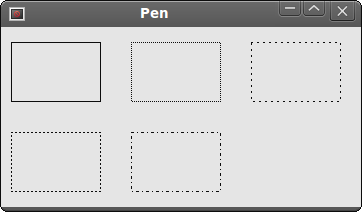
画笔
画笔是一个基本的图形对象。它用于绘制线条、曲线以及矩形、椭圆、多边形或其他形状的轮廓。
wxPen(const wxColour& colour, int width = 1, int style = wxSOLID)
wxPen 构造函数有三个参数:颜色、宽度和样式。以下是可能的画笔样式列表
wxSOLIDwxDOTwxLONG_DASHwxSHORT_DASHwxDOT_DASHwxTRANSPARENT
#include <wx/wx.h>

class Pen : public wxFrame
{
public:
    Pen(const wxString& title);

    void OnPaint(wxPaintEvent& event);

};
#include "pen.h"


Pen::Pen(const wxString& title)
       : wxFrame(NULL, wxID_ANY, title, wxDefaultPosition, wxSize(360, 180))
{
  this->Connect(wxEVT_PAINT, wxPaintEventHandler(Pen::OnPaint));
  this->Centre();
}

void Pen::OnPaint(wxPaintEvent& event)
{
  wxPaintDC dc(this);

  wxColour col1, col2;

  col1.Set(wxT("#0c0c0c"));
  col2.Set(wxT("#000000"));

  wxBrush brush(wxColour(255, 255, 255), wxTRANSPARENT);
  dc.SetBrush(brush);

  dc.SetPen(wxPen(col1, 1, wxSOLID));
  dc.DrawRectangle(10, 15, 90, 60);

  dc.SetPen(wxPen(col1, 1, wxDOT));
  dc.DrawRectangle(130, 15, 90, 60);

  dc.SetPen(wxPen(col1, 1, wxLONG_DASH));
  dc.DrawRectangle(250, 15, 90, 60);

  dc.SetPen(wxPen(col1, 1, wxSHORT_DASH));
  dc.DrawRectangle(10, 105, 90, 60);

  dc.SetPen(wxPen(col1, 1, wxDOT_DASH));
  dc.DrawRectangle(130, 105, 90, 60);

  dc.SetPen(wxPen(col1, 1, wxTRANSPARENT));
  dc.DrawRectangle(250, 105, 90, 60);
}
#include <wx/wx.h>

class MyApp : public wxApp
{
  public:
    virtual bool OnInit();
};
#include "main.h"
#include "pen.h"

IMPLEMENT_APP(MyApp)

bool MyApp::OnInit()
{
  Pen *pen = new Pen(wxT("Pen"));
  pen->Show(true);

  return true;
}
在我们的示例中,我们绘制了 6 个具有不同画笔样式的矩形。最后一个是透明的,不可见。
dc.SetPen(wxPen(col1, 1, wxSOLID));
dc.DrawRectangle(10, 15, 90, 60);
在这里,我们为我们的第一个矩形定义一个画笔。我们设置一个颜色为 col1 (#0c0c0c)、宽度为 1 像素、实心的画笔。DrawRectangle 方法绘制矩形。
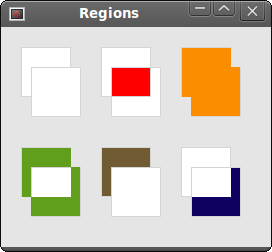
区域
区域可以组合起来创建更复杂的形状。我们可以使用四个集合操作:Union、Intersect、Substract 和 Xor。以下示例展示了所有四个操作。
#include <wx/wx.h>

class Regions : public wxFrame
{
public:
  Regions(const wxString & title);

  void OnPaint(wxPaintEvent & event);

};
#include "Regions.h"


Regions::Regions(const wxString& title)
       : wxFrame(NULL, wxID_ANY, title, wxDefaultPosition, wxSize(270, 220))
{
  this->Connect(wxEVT_PAINT, wxPaintEventHandler(Regions::OnPaint));
  this->Centre();
}

void Regions::OnPaint(wxPaintEvent & event)
{
  wxPaintDC dc(this);
  wxColour gray, white, red, blue;
  wxColour orange, green, brown;

  gray.Set(wxT("#d4d4d4"));
  white.Set(wxT("#ffffff"));
  red.Set(wxT("#ff0000"));
  orange.Set(wxT("#fa8e00"));
  green.Set(wxT("#619e1b"));
  brown.Set(wxT("#715b33"));
  blue.Set(wxT("#0d0060"));

  dc.SetPen(wxPen(gray));

  dc.DrawRectangle(20, 20, 50, 50);
  dc.DrawRectangle(30, 40, 50, 50);

  dc.SetBrush(wxBrush(white));
  dc.DrawRectangle(100, 20, 50, 50);
  dc.DrawRectangle(110, 40, 50, 50);
  wxRegion region1(100, 20, 50, 50);
  wxRegion region2(110, 40, 50, 50);
  region1.Intersect(region2);
  wxRect rect1 = region1.GetBox();
  dc.SetClippingRegion(region1);
  dc.SetBrush(wxBrush(red));
  dc.DrawRectangle(rect1);
  dc.DestroyClippingRegion();

  dc.SetBrush(wxBrush(white));
  dc.DrawRectangle(180, 20, 50, 50);
  dc.DrawRectangle(190, 40, 50, 50);
  wxRegion region3(180, 20, 50, 50);
  wxRegion region4(190, 40, 50, 50);
  region3.Union(region4);
  dc.SetClippingRegion(region3);
  wxRect rect2 = region3.GetBox();
  dc.SetBrush(wxBrush(orange));
  dc.DrawRectangle(rect2);
  dc.DestroyClippingRegion();

  dc.SetBrush(wxBrush(white));
  dc.DrawRectangle(20, 120, 50, 50);
  dc.DrawRectangle(30, 140, 50, 50);
  wxRegion region5(20, 120, 50, 50);
  wxRegion region6(30, 140, 50, 50);
  region5.Xor(region6);
  wxRect rect3 = region5.GetBox();
  dc.SetClippingRegion(region5);
  dc.SetBrush(wxBrush(green));
  dc.DrawRectangle(rect3);
  dc.DestroyClippingRegion();

  dc.SetBrush(wxBrush(white));
  dc.DrawRectangle(100, 120, 50, 50);
  dc.DrawRectangle(110, 140, 50, 50);
  wxRegion region7(100, 120, 50, 50);
  wxRegion region8(110, 140, 50, 50);
  region7.Subtract(region8);
  wxRect rect4 = region7.GetBox();
  dc.SetClippingRegion(region7);
  dc.SetBrush(wxBrush(brown));
  dc.DrawRectangle(rect4);
  dc.DestroyClippingRegion();

  dc.SetBrush(white);
  dc.DrawRectangle(180, 120, 50, 50);
  dc.DrawRectangle(190, 140, 50, 50);
  wxRegion region9(180, 120, 50, 50);
  wxRegion region10(190, 140, 50, 50);
  region10.Subtract(region9);
  wxRect rect5 = region10.GetBox();
  dc.SetClippingRegion(region10);
  dc.SetBrush(wxBrush(blue));
  dc.DrawRectangle(rect5);
  dc.DestroyClippingRegion();
}
#include <wx/wx.h>

class MyApp : public wxApp
{
  public:
    virtual bool OnInit();
};
#include "main.h"
#include "Regions.h"

IMPLEMENT_APP(MyApp)

bool MyApp::OnInit()
{
  Regions *regions = new Regions(wxT("Regions"));
  regions->Show(true);

  return true;
}
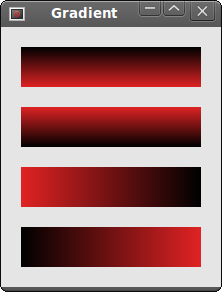
渐变
在计算机图形学中,渐变是从亮到暗或从一种颜色到另一种颜色的平滑混合。在 2D 绘图程序和绘画程序中,渐变用于创建彩色背景和特殊效果,以及模拟光线和阴影。(answers.com)
void GradientFillLinear(const wxRect& rect, const wxColour& initialColour,
     const wxColour& destColour, wxDirection nDirection = wxEAST)
此方法使用线性渐变填充由矩形指定的区域,从 initialColour 开始,最终淡化到 destColour。nDirection 参数指定颜色更改的方向,默认值为 wxEAST。
#include <wx/wx.h>

class Gradient : public wxFrame
{
public:
  Gradient(const wxString& title);

  void OnPaint(wxPaintEvent& event);

};
#include "gradient.h"


Gradient::Gradient(const wxString& title)
       : wxFrame(NULL, wxID_ANY, title, wxDefaultPosition, wxSize(220, 260))
{
  this->Connect(wxEVT_PAINT, wxPaintEventHandler(Gradient::OnPaint));
  this->Centre();
}

void Gradient::OnPaint(wxPaintEvent& event)
{
  wxPaintDC dc(this);


  wxColour col1, col2;

  col1.Set(wxT("#e12223"));
  col2.Set(wxT("#000000"));

  dc.GradientFillLinear(wxRect(20, 20, 180, 40), col1, col2, wxNORTH);
  dc.GradientFillLinear(wxRect(20, 80, 180, 40), col1, col2, wxSOUTH);
  dc.GradientFillLinear(wxRect(20, 140, 180, 40), col1, col2, wxEAST);
  dc.GradientFillLinear(wxRect(20, 200, 180, 40), col1, col2, wxWEST);
}
#include <wx/wx.h>

class MyApp : public wxApp
{
  public:
    virtual bool OnInit();
};
#include "main.h"
#include "gradient.h"

IMPLEMENT_APP(MyApp)

bool MyApp::OnInit()
{
  Gradient *grad = new Gradient(wxT("Gradient"));
  grad->Show(true);

  return true;
}
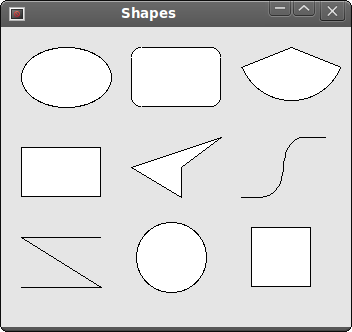
形状
形状是更复杂的几何对象。我们在以下示例中绘制各种几何形状。
#include <wx/wx.h>

class Shapes : public wxFrame
{
public:
    Shapes(const wxString & title);

    void OnPaint(wxPaintEvent & event);

};
#include "shapes.h"


Shapes::Shapes(const wxString& title)
       : wxFrame(NULL, wxID_ANY, title, wxDefaultPosition, wxSize(350, 300))
{
  this->Connect(wxEVT_PAINT, wxPaintEventHandler(Shapes::OnPaint));
  this->Centre();
}

void Shapes::OnPaint(wxPaintEvent& event)
{
  wxPaintDC dc(this);

  wxPoint lines[] = { wxPoint(20, 260), wxPoint(100, 260),
          wxPoint(20, 210), wxPoint(100, 210) };
  wxPoint polygon[] = { wxPoint(130, 140), wxPoint(180, 170),
          wxPoint(180, 140), wxPoint(220, 110), wxPoint(140, 100) };
  wxPoint splines[] = { wxPoint(240, 170), wxPoint(280, 170),
          wxPoint(285, 110), wxPoint(325, 110) };

  dc.DrawEllipse(20, 20, 90, 60);
  dc.DrawRoundedRectangle(130, 20, 90, 60, 10);
  dc.DrawArc(240, 40, 340, 40, 290, 20);

  dc.DrawPolygon(4, polygon);
  dc.DrawRectangle(20, 120, 80, 50);
  dc.DrawSpline(4, splines);

  dc.DrawLines(4, lines);
  dc.DrawCircle(170, 230, 35);
  dc.DrawRectangle(250, 200, 60, 60);

}
#include <wx/wx.h>

class MyApp : public wxApp
{
  public:
    virtual bool OnInit();
};
#include "main.h"
#include "shapes.h"

IMPLEMENT_APP(MyApp)

bool MyApp::OnInit()
{

    Shapes *shapes = new Shapes(wxT("Shapes"));
    shapes->Show(true);

    return true;
}
在本章中,我们介绍了 wxWidgets 中的 GDI。