Qt5 中的布局管理
最后修改于 2023 年 10 月 18 日
在本 Qt5 编程教程中,我们将讨论小部件的布局管理。 我们提到了 QHBoxLayout、QVBoxLayout、QFormLayout 和 QGridLayout 管理器。
一个典型的应用程序由各种小部件组成。 这些小部件放置在布局中。 程序员必须管理应用程序的布局。 在 Qt5 中,我们有两个选择
- 绝对定位
- 布局管理器
绝对定位
程序员以像素为单位指定每个小部件的位置和大小。 当我们使用绝对定位时,我们必须理解几件事。
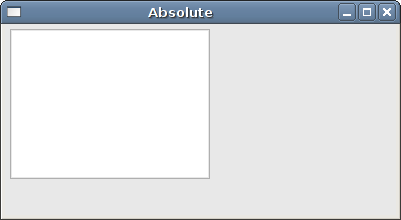
- 如果我们调整窗口大小,小部件的大小和位置不会改变。
- 应用程序在各种平台上看起来不同(通常很糟糕)。
- 更改应用程序中的字体可能会破坏布局。
- 如果我们决定更改我们的布局,我们必须完全重做我们的布局,这既乏味又耗时。
可能存在我们可以使用绝对定位的情况。 但大多数情况下,在现实世界的程序中,程序员使用布局管理器。
#include <QApplication>
#include <QDesktopWidget>
#include <QTextEdit>

class Absolute : public QWidget {

 public:
     Absolute(QWidget *parent = nullptr);
};

Absolute::Absolute(QWidget *parent)
    : QWidget(parent) {

  auto *ledit = new QTextEdit(this);
  ledit->setGeometry(5, 5, 200, 150);
}

int main(int argc, char *argv[]) {

  QApplication app(argc, argv);

  Absolute window;

  window.setWindowTitle("Absolute");
  window.show();

  return app.exec();
}
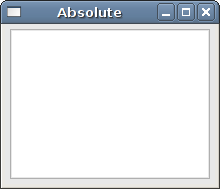
setGeometry 方法用于在绝对坐标中将小部件放置在窗口上。
auto *edit = new QTextEdit(this);
ledit->setGeometry(5, 5, 200, 150);
我们创建一个 QTextEdit 小部件并手动定位它。 setGeometry 方法做了两件事:它将小部件定位到绝对坐标并调整小部件的大小。
Qt5 QVBoxLayout
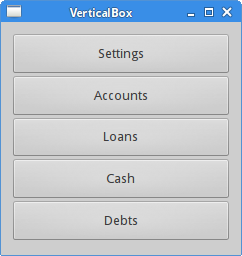
QVBoxLayout 类垂直排列小部件。 使用 addWidget 方法将小部件添加到布局中。
#pragma once

#include <QWidget>

class VerticalBox : public QWidget {

  public:
    VerticalBox(QWidget *parent = nullptr);
};
头文件。
#include <QVBoxLayout>
#include <QPushButton>
#include "vertical_box.h"

VerticalBox::VerticalBox(QWidget *parent)
    : QWidget(parent) {

  auto *vbox = new QVBoxLayout(this);
  vbox->setSpacing(1);

  auto *settings = new QPushButton("Settings", this);
  settings->setSizePolicy(QSizePolicy::Expanding, QSizePolicy::Expanding);

  auto *accounts = new QPushButton("Accounts", this);
  accounts->setSizePolicy(QSizePolicy::Expanding, QSizePolicy::Expanding);

  auto *loans = new QPushButton("Loans", this);
  loans->setSizePolicy(QSizePolicy::Expanding, QSizePolicy::Expanding);

  auto *cash = new QPushButton("Cash", this);
  cash->setSizePolicy(QSizePolicy::Expanding, QSizePolicy::Expanding);

  auto *debts = new QPushButton("Debts", this);
  debts->setSizePolicy(QSizePolicy::Expanding, QSizePolicy::Expanding);

  vbox->addWidget(settings);
  vbox->addWidget(accounts);
  vbox->addWidget(loans);
  vbox->addWidget(cash);
  vbox->addWidget(debts);

  setLayout(vbox);
}
在我们的示例中,我们有一个垂直布局管理器。 我们在其中放置了五个按钮。 我们使所有按钮在两个方向上都可扩展。
auto *vbox = new QVBoxLayout(this);
vbox->setSpacing(1);
我们创建 QVBoxLayout 并设置子小部件之间的 1 像素间距。
auto *settings = new QPushButton("Settings", this);
settings->setSizePolicy(QSizePolicy::Expanding, QSizePolicy::Expanding);
我们创建一个按钮并为其设置大小策略。 子小部件由布局管理器管理。 默认情况下,按钮水平展开,垂直方向具有固定大小。 如果我们要更改它,我们设置一个新的大小策略。 在我们的例子中,按钮可以向两个方向扩展。
vbox->addWidget(settings);
vbox->addWidget(accounts);
...
我们使用 addWidget 方法将子小部件添加到布局管理器。
setLayout(vbox);
我们为窗口设置 QVBoxLayout 管理器。
#include <QApplication>
#include "vertical_box.h"

int main(int argc, char *argv[]) {

  QApplication app(argc, argv);

  VerticalBox window;

  window.resize(240, 230);
  window.setWindowTitle("VerticalBox");
  window.show();

  return app.exec();
}
主文件。
按钮
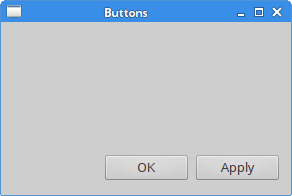
在下面的示例中,我们在窗口的客户区显示两个按钮。 它们将位于窗口的右下角。
#pragma once

#include <QWidget>
#include <QPushButton>

class Buttons : public QWidget {

  public:
    Buttons(QWidget *parent = nullptr);

  private:
    QPushButton *okBtn;
    QPushButton *applyBtn;
};
头文件。
#include <QVBoxLayout>
#include <QHBoxLayout>
#include "buttons.h"

Buttons::Buttons(QWidget *parent)
    : QWidget(parent) {

  auto *vbox = new QVBoxLayout(this);
  auto *hbox = new QHBoxLayout();

  okBtn = new QPushButton("OK", this);
  applyBtn = new QPushButton("Apply", this);

  hbox->addWidget(okBtn, 1, Qt::AlignRight);
  hbox->addWidget(applyBtn, 0);

  vbox->addStretch(1);
  vbox->addLayout(hbox);
}
假设我们想在窗口的右下角有两个按钮。
auto *vbox = new QVBoxLayout(this);
auto *hbox = new QHBoxLayout();
我们创建两个盒子布局管理器:一个垂直和一个水平盒子布局管理器。
okBtn = new QPushButton("OK", this);
applyBtn = new QPushButton("Apply", this);
我们创建两个按钮。
hbox->addWidget(okBtn, 1, Qt::AlignRight);
hbox->addWidget(applyBtn, 0);
按钮放置在水平布局管理器中。 使用 addWidget 方法。 这些按钮靠右对齐。 第一个参数是子小部件。 第二个参数是拉伸因子,最后一个参数是对齐方式。 通过将“确定”按钮的拉伸因子设置为 1,我们为它提供了从左侧到窗口右侧的空间。 该小部件不会扩展到分配给它的所有空间。 最后,Qt::AlignRight 常量将小部件与分配空间的右侧对齐。
vbox->addStretch(1);
vbox->addLayout(hbox);
我们通过调用 addStretch 方法将一个空的、可扩展的空间放入垂直框中。 然后我们将水平框布局添加到垂直框布局中。
#include <QApplication>
#include "buttons.h"

int main(int argc, char *argv[]) {

  QApplication app(argc, argv);

  Buttons window;

  window.resize(290, 170);
  window.setWindowTitle("Buttons");
  window.show();

  return app.exec();
}
主文件。
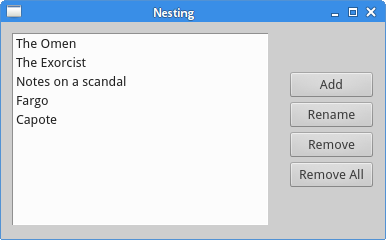
Qt5 嵌套布局
以下示例的想法是表明布局管理器可以组合使用。 通过组合甚至简单的布局,我们可以创建复杂的对话框或窗口。 要嵌套布局,我们使用 addLayout 方法。
#pragma once

#include <QWidget>

class Layouts : public QWidget {

  public:
    Layouts(QWidget *parent = nullptr);
};
这是头文件。
#include <QVBoxLayout>
#include <QPushButton>
#include <QListWidget>
#include "nesting.h"

Layouts::Layouts(QWidget *parent)
    : QWidget(parent) {

  auto *vbox = new QVBoxLayout();
  auto *hbox = new QHBoxLayout(this);

  auto *lw = new QListWidget(this);
  lw->addItem("The Omen");
  lw->addItem("The Exorcist");
  lw->addItem("Notes on a scandal");
  lw->addItem("Fargo");
  lw->addItem("Capote");

  auto *add = new QPushButton("Add", this);
  auto *rename = new QPushButton("Rename", this);
  auto *remove = new QPushButton("Remove", this);
  auto *removeall = new QPushButton("Remove All", this);

  vbox->setSpacing(3);
  vbox->addStretch(1);
  vbox->addWidget(add);
  vbox->addWidget(rename);
  vbox->addWidget(remove);
  vbox->addWidget(removeall);
  vbox->addStretch(1);

  hbox->addWidget(lw);
  hbox->addSpacing(15);
  hbox->addLayout(vbox);

  setLayout(hbox);
}
在示例中,我们创建了一个窗口,该窗口由四个按钮和一个列表小部件组成。 按钮分组在一个垂直列中,并放置在列表小部件的右侧。 如果我们调整窗口大小,列表小部件也会被调整大小。
auto *vbox = new QVBoxLayout();
QVBoxLayout 是按钮的列。
auto *hbox = new QHBoxLayout(this);
QHBoxLayout 是小部件的基本布局。
auto *lw = new QListWidget(this);
lw->addItem("The Omen");
lw->addItem("The Exorcist");
lw->addItem("Notes on a scandal");
lw->addItem("Fargo");
lw->addItem("Capote");
创建 QListWidget。
auto *add = new QPushButton("Add", this);
auto *rename = new QPushButton("Rename", this);
auto *remove = new QPushButton("Remove", this);
auto *removeall = new QPushButton("Remove All", this);
在这里,我们创建了四个按钮。
vbox->setSpacing(3);
vbox->addStretch(1);
vbox->addWidget(add);
vbox->addWidget(rename);
vbox->addWidget(remove);
vbox->addWidget(removeall);
vbox->addStretch(1);
创建带有四个按钮的垂直框。 我们在按钮之间留出一些小空间。 注意,我们在垂直框的顶部和底部都添加了一个拉伸因子。 这样按钮就垂直居中了。
hbox->addWidget(lw);
hbox->addSpacing(15);
hbox->addLayout(vbox);
列表小部件和按钮的垂直框放置在水平框布局中。 addLayout 方法用于将一个布局添加到另一个布局。
setLayout(hbox);
我们为父窗口设置基本布局。
#include <QApplication>
#include "nesting.h"

int main(int argc, char *argv[]) {

  QApplication app(argc, argv);

  Layouts window;

  window.setWindowTitle("Layouts");
  window.show();

  return app.exec();
}
这是主文件。
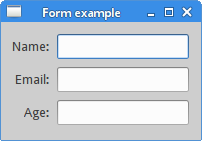
Qt5 FormLayout
QFormLayout 是一个简单的布局管理器,用于管理输入小部件及其关联标签的表单。 它将其子项以两列表单的形式布局。 左列由标签组成,右列由输入小部件组成,例如 QLineEdit 或 QSpinBox。
#pragma once

#include <QWidget>

class FormEx : public QWidget {

  public:
    FormEx(QWidget *parent = nullptr);
};
这是头文件。
#include <QFormLayout>
#include <QLabel>
#include <QLineEdit>
#include "form.h"

FormEx::FormEx(QWidget *parent)
    : QWidget(parent) {

  auto *nameEdit = new QLineEdit(this);
  auto *addrEdit = new QLineEdit(this);
  auto *occpEdit = new QLineEdit(this);

  auto *formLayout = new QFormLayout;
  formLayout->setLabelAlignment(Qt::AlignRight | Qt::AlignVCenter);
  formLayout->addRow("Name:", nameEdit);
  formLayout->addRow("Email:", addrEdit);
  formLayout->addRow("Age:", occpEdit);

  setLayout(formLayout);
}
该示例创建了一个表单,该表单由三个标签和三个行编辑组成。
auto *formLayout = new QFormLayout;
创建 QFormLayout 的实例。
formLayout->setLabelAlignment(Qt::AlignRight | Qt::AlignVCenter);
使用 setLabelAlignment 方法,我们设置标签小部件的对齐方式。
formLayout->addRow("Name:", nameEdit);
addRow 方法使用给定的标签和输入小部件将新行添加到表单布局的底部。
#include <QApplication>
#include "form.h"

int main(int argc, char *argv[]) {

  QApplication app(argc, argv);

  FormEx window;

  window.setWindowTitle("Form example");
  window.show();

  return app.exec();
}
这是主文件。
Qt5 QGridLayout
QGridLayout 将其小部件放置在网格中。 这是一个强大的布局管理器。
#pragma once

#include <QWidget>

class Calculator : public QWidget {

  public:
    Calculator(QWidget *parent = nullptr);
};
头文件。
#include <QGridLayout>
#include <QPushButton>
#include "calculator.h"

Calculator::Calculator(QWidget *parent)
    : QWidget(parent) {

  auto *grid = new QGridLayout(this);
  grid->setSpacing(2);

  QVector<QString> values({ "7", "8", "9", "/",
    "4", "5", "6", "*",
    "1", "2", "3", "-",
    "0", ".", "=", "+"
  });

  int pos = 0;

  for (int i=0; i<4; i++) {
   for (int j=0; j<4; j++) {

     auto *btn = new QPushButton(values[pos], this);
     btn->setFixedSize(40, 40);
     grid->addWidget(btn, i, j);
     pos++;
   }
  }

  setLayout(grid);
}
我们创建一个计算器的框架。
auto *grid = new QGridLayout(this);
grid->setSpacing(2);
我们创建网格布局,并在子小部件之间设置 2 像素的间距。
QVector<QString> values({ "7", "8", "9", "/",
  "4", "5", "6", "*",
  "1", "2", "3", "-",
  "0", ".", "=", "+"
});
这些是显示在按钮上的字符。
for (int i=0; i<4; i++) {
  for (int j=0; j<4; j++) {

    auto *btn = new QPushButton(values[pos], this);
    btn->setFixedSize(40, 40);
    grid->addWidget(btn, i, j);
    pos++;
  }
}
我们将十六个小部件放置在网格布局中。 每个按钮都有一个固定大小。
#include <QApplication>
#include "calculator.h"

int main(int argc, char *argv[]) {

  QApplication app(argc, argv);

  Calculator window;

  window.setWindowTitle("Calculator");
  window.show();

  return app.exec();
}
这是主文件。

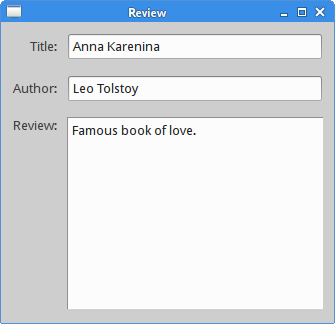
回顾
在本章的下一个示例中,我们使用 QGridLayout 管理器创建一个更复杂的窗口。
#pragma once

#include <QWidget>

class Review : public QWidget {

  public:
    Review(QWidget *parent = nullptr);
};
头文件。
#include <QGridLayout>
#include <QLabel>
#include <QLineEdit>
#include <QTextEdit>
#include "review.h"

Review::Review(QWidget *parent)
    : QWidget(parent) {

  auto *grid = new QGridLayout(this);
  grid->setVerticalSpacing(15);
  grid->setHorizontalSpacing(10);

  auto *title = new QLabel("Title:", this);
  grid->addWidget(title, 0, 0, 1, 1);
  title->setAlignment(Qt::AlignRight | Qt::AlignVCenter);

  auto *edt1 = new QLineEdit(this);
  grid->addWidget(edt1, 0, 1, 1, 1);

  auto *author = new QLabel("Author:", this);
  grid->addWidget(author, 1, 0, 1, 1);
  author->setAlignment(Qt::AlignRight | Qt::AlignVCenter);

  auto *edt2 = new QLineEdit(this);
  grid->addWidget(edt2, 1, 1, 1, 1);

  auto *review = new QLabel("Review:", this);
  grid->addWidget(review, 2, 0, 1, 1);
  review->setAlignment(Qt::AlignRight | Qt::AlignTop);

  auto *te = new QTextEdit(this);
  grid->addWidget(te, 2, 1, 3, 1);

  setLayout(grid);
}
代码创建一个窗口,该窗口可用于输入作者、标题和书籍的评论。
auto *grid = new QGridLayout(this);
创建 QGridLayout 管理器。
grid->setVerticalSpacing(15);
grid->setHorizontalSpacing(10);
我们使用 setVerticalSpacing 方法添加垂直间距,并使用 setHorizontalSpacing 方法添加水平间距。
auto *title = new QLabel("Title", this);
grid->addWidget(title, 0, 0, 1, 1);
这些代码行创建一个标签小部件并将其放置在网格布局中。 addWidget 方法有五个参数。 第一个参数是子小部件,在本例中是一个标签。 接下来的两个参数是放置标签的网格中的行和列。 最后,最后一个参数是行跨度和列跨度。 这些参数指定当前小部件将跨越的行数。 在我们的例子中,标签将只跨越一列和一行。
title->setAlignment(Qt::AlignRight | Qt::AlignVCenter);
setAlignment 方法将标题标签在其单元格中对齐。 水平方向,它靠右对齐。 垂直方向,它居中对齐。
auto *te = new QTextEdit(this);
grid->addWidget(te, 2, 1, 3, 1);
将 QTextEdit 小部件放置在第三行第二列;它跨越三行一列。
#include <QApplication>
#include "review.h"

int main(int argc, char *argv[]) {

  QApplication app(argc, argv);

  Review window;

  window.setWindowTitle("Review");
  window.show();

  return app.exec();
}
主文件。
Qt5 教程的这一部分专门用于布局管理。