Qt4 中的自定义组件
最后修改于 2023 年 10 月 18 日
在本 Qt4 C++ 编程教程中,我们创建一个自定义组件。
大多数工具包通常只提供最常见的组件,如按钮、文本组件或滑块。没有工具包能提供所有可能的组件。程序员必须自己创建此类组件。他们通过使用工具包提供的绘图工具来实现。有两种可能:程序员可以修改或增强现有组件,或者他可以从头开始创建一个自定义组件。
燃烧组件
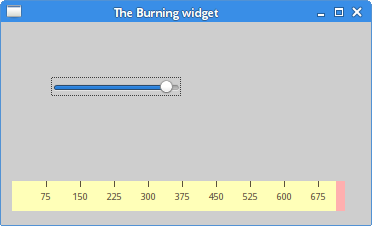
在下一个例子中,我们创建一个自定义的 Burning 组件。这个组件可以在 Nero 或 K3B 等应用程序中看到。该组件将从头开始创建。
#pragma once

#include <QWidget>
#include <QSlider>
#include <QFrame>
#include "widget.h"

class Burning : public QFrame {

  Q_OBJECT

  public:
    Burning(QWidget *parent = 0);
    int getCurrentWidth();

  public slots:
    void valueChanged(int);

  private:
    QSlider *slider;
    Widget *widget;
    int cur_width;

    void initUI();
};
这是该示例主窗口的头文件。
public:
  Burning(QWidget *parent = 0);
  int getCurrentWidth();
getCurrentWidth 方法将被用来确定滑块的值。
private:
  QSlider *slider;
  Widget *widget;
  int cur_width;

  void initUI();
我们在窗口的客户区有两个组件:一个内置的滑块组件和一个自定义组件。cur_width 变量将保存滑块的当前值。此值用于绘制自定义组件。
#include <QtGui>
#include "burning.h"

Burning::Burning(QWidget *parent)
    : QFrame(parent) {

  initUI();
}

void Burning::initUI() {

  const int MAX_VALUE = 750;
  cur_width = 0;

  slider = new QSlider(Qt::Horizontal , this);
  slider->setMaximum(MAX_VALUE);
  slider->setGeometry(50, 50, 130, 30);

  connect(slider, SIGNAL(valueChanged(int)),
          this, SLOT(valueChanged(int)));

  QVBoxLayout *vbox = new QVBoxLayout(this);
  QHBoxLayout *hbox = new QHBoxLayout();

  vbox->addStretch(1);

  widget = new Widget(this);
  hbox->addWidget(widget, 0);

  vbox->addLayout(hbox);

  setLayout(vbox);
}

void Burning::valueChanged(int val) {

  cur_width = val;
  widget->repaint();
}

int Burning::getCurrentWidth() {

  return cur_width;
}
在这里,我们构建该示例的主窗口。
connect(slider, SIGNAL(valueChanged(int)),
        this, SLOT(valueChanged(int)));
当我们移动滑块时,valueChanged 插槽被执行。
void Burning::valueChanged(int val) {

  cur_width = val;
  widget->repaint();
}
当我们更改滑块的值时,我们存储新值并重新绘制自定义组件。
#pragma once

#include <QFrame>

class Burning;

class Widget : public QFrame {

  Q_OBJECT

  public:
    Widget(QWidget *parent = 0);

  protected:
    void paintEvent(QPaintEvent *e);
    void drawWidget(QPainter &qp);

  private:
    QWidget *m_parent;
    Burning *burn;
};
这是自定义燃烧组件的头文件。
private:
  QWidget *m_parent;
  Burning *burn;
我们存储一个指向父组件的指针。我们通过这个指针获取 cur_width。
#include <QtGui>
#include "widget.h"
#include "burning.h"

const int PANEL_HEIGHT = 30;

Widget::Widget(QWidget *parent)
    : QFrame(parent) {

  m_parent = parent;
  setMinimumHeight(PANEL_HEIGHT);
}

void Widget::paintEvent(QPaintEvent *e) {

  QPainter qp(this);
  drawWidget(qp);

  QFrame::paintEvent(e);
}

void Widget::drawWidget(QPainter &qp) {

  const int DISTANCE = 19;
  const int LINE_WIDTH = 5;
  const int DIVISIONS = 10;
  const float FULL_CAPACITY = 700;
  const float MAX_CAPACITY = 750;

  QString num[] = { "75", "150", "225", "300", "375", "450",
    "525", "600", "675" };
  int asize = sizeof(num)/sizeof(num[1]);

  QColor redColor(255, 175, 175);
  QColor yellowColor(255, 255, 184);

  int width = size().width();

  Burning *burn = (Burning *) m_parent;
  int cur_width = burn->getCurrentWidth();

  int step = (int) qRound(width / DIVISIONS);
  int till = (int) ((width / MAX_CAPACITY) * cur_width);
  int full = (int) ((width / MAX_CAPACITY) * FULL_CAPACITY);

  if (cur_width >= FULL_CAPACITY) {

    qp.setPen(yellowColor);
    qp.setBrush(yellowColor);
    qp.drawRect(0, 0, full, 30);
    qp.setPen(redColor);
    qp.setBrush(redColor);
    qp.drawRect(full, 0, till-full, PANEL_HEIGHT);

  } else if (till > 0) {

    qp.setPen(yellowColor);
    qp.setBrush(yellowColor);
    qp.drawRect(0, 0, till, PANEL_HEIGHT);
  }

  QColor grayColor(90, 80, 60);
  qp.setPen(grayColor);

  for (int i=1; i <=asize; i++) {

    qp.drawLine(i*step, 0, i*step, LINE_WIDTH);
    QFont newFont = font();
    newFont.setPointSize(7);
    setFont(newFont);

    QFontMetrics metrics(font());

    int w = metrics.width(num[i-1]);
    qp.drawText(i*step-w/2, DISTANCE, num[i-1]);
  }
}
在这里,我们绘制自定义组件。我们绘制矩形、垂直线和数字。
void Widget::paintEvent(QPaintEvent *e) {

  QPainter qp(this);
  drawWidget(qp);

  QFrame::paintEvent(e);
}
自定义组件的绘制委托给 drawWidget 方法。
const int DISTANCE = 19;
const int LINE_WIDTH = 5;
const int DIVISIONS = 10;
const float FULL_CAPACITY = 700;
const float MAX_CAPACITY = 750;
这些是重要的常量。DISTANCE 是刻度上数字与其父边框顶部的距离。LINE_WIDTH 是垂直线的宽度。DIVISIONS 是刻度的分段数。FULL_CAPACITY 是介质的容量。达到后,会发生过度燃烧。这用红色表示。MAX_CAPACITY 是介质的最大容量。
QString num[] = { "75", "150", "225", "300", "375", "450",
  "525", "600", "675" };
我们使用这些数字来构建 Burning 组件的刻度。
int width = size().width();
我们获取组件的宽度。自定义组件的宽度是动态的。它可以被用户调整大小。
Burning *burn = (Burning *) m_parent;
int cur_width = burn->getCurrentWidth();
我们获取 cur_width 值。
int till = (int) ((width / MAX_CAPACITY) * cur_width);
int full = (int) ((width / MAX_CAPACITY) * FULL_CAPACITY);
我们使用 width 变量来执行转换,在刻度的值和自定义组件的度量之间进行转换。
qp.setPen(redColor);
qp.setBrush(redColor);
qp.drawRect(full, 0, till-full, PANEL_HEIGHT);
这三行绘制红色矩形,表示过度燃烧。
qp.drawLine(i*step, 0, i*step, LINE_WIDTH);
在这里,我们绘制小的垂直线。
QFontMetrics metrics(font());

int w = metrics.width(num[i-1]);
qp.drawText(i*step-w/2, DISTANCE, num[i-1]);
在这里,我们绘制刻度的数字。为了精确定位数字,我们必须获取字符串的宽度。
#include <QApplication>
#include "burning.h"

int main(int argc, char *argv[]) {

  QApplication app(argc, argv);
  Burning window;

  window.resize(370, 200);
  window.setWindowTitle("The Burning widget");
  window.show();

  return app.exec();
}
这是主文件。
在本 Qt4 教程中,我们创建了一个自定义的 Burning 组件。