GTK# 中的布局管理
最后修改于 2023 年 10 月 18 日
在本章中,我们将展示如何在窗口或对话框中布局我们的控件。
当我们设计应用程序的 GUI 时,我们会决定使用哪些控件以及如何在应用程序中组织这些控件。为了组织我们的控件,我们使用称为布局容器的特殊不可见控件。在本章中,我们提到了 Alignment、Fixed、VBox 和 Table。
Fixed(固定)
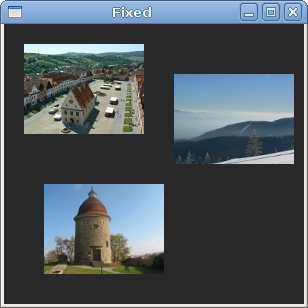
Fixed 容器将子控件放置在固定的位置和固定的尺寸。此容器不执行自动布局管理。在大多数应用程序中,我们不使用此容器。有一些专门的领域,我们使用它。例如游戏、使用图表的专用应用程序、可移动的调整大小组件(如电子表格应用程序中的图表)、小型教育示例。
using Gtk;
using System;

class SharpApp : Window {

    private Gdk.Pixbuf rotunda;
    private Gdk.Pixbuf bardejov;
    private Gdk.Pixbuf mincol;

    public SharpApp() : base("Fixed")
    {
        SetDefaultSize(300, 280);
        SetPosition(WindowPosition.Center);
        ModifyBg(StateType.Normal, new Gdk.Color(40, 40, 40));
        DeleteEvent += delegate { Application.Quit(); };

        try {
            bardejov = new Gdk.Pixbuf("bardejov.jpg");
            rotunda = new Gdk.Pixbuf("rotunda.jpg");
            mincol = new Gdk.Pixbuf("mincol.jpg");
        } catch {
            Console.WriteLine("Images not found");
            Environment.Exit(1);
        }

        Image image1 = new Image(bardejov);
        Image image2 = new Image(rotunda);
        Image image3 = new Image(mincol);


        Fixed fix = new Fixed();

        fix.Put(image1, 20, 20);
        fix.Put(image2, 40, 160);
        fix.Put(image3, 170, 50);

        Add(fix);
        ShowAll();
    }


    public static void Main()
    {
        Application.Init();
        new SharpApp();
        Application.Run();
    }
}
在我们的示例中,我们在窗口上显示三个小图像。我们明确指定了放置这些图像的 x、y 坐标。
ModifyBg(StateType.Normal, new Gdk.Color(40, 40, 40));
为了获得更好的视觉体验,我们将背景颜色更改为深灰色。
bardejov = new Gdk.Pixbuf("bardejov.jpg");
我们将图像从磁盘加载到 Gdk.Pixbuf 对象。
Image image1 = new Image(bardejov);
Image image2 = new Image(rotunda);
Image image3 = new Image(mincol);
Image 是一个用于显示图像的控件。它在构造函数中接受 Gdk.Pixbuf 对象。
Fixed fix = new Fixed();
我们创建 Fixed 容器。
fix.Put(image1, 20, 20);
我们将第一张图像放置在 x=20, y=20 坐标处。
Add(fix);
最后,我们将 Fixed 容器添加到 Window 中。
Alignment(对齐)
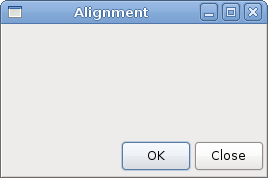
Alignment 容器控制其子控件的对齐方式和大小。
using Gtk;
using System;

class SharpApp : Window {


    public SharpApp() : base("Alignment")
    {
        SetDefaultSize(260, 150);
        SetPosition(WindowPosition.Center);
        DeleteEvent += delegate { Application.Quit(); };

        VBox vbox = new VBox(false, 5);
        HBox hbox = new HBox(true, 3);

        Alignment valign = new Alignment(0, 1, 0, 0);
        vbox.PackStart(valign);

        Button ok = new Button("OK");
        ok.SetSizeRequest(70, 30);
        Button close = new Button("Close");

        hbox.Add(ok);
        hbox.Add(close);

        Alignment halign = new Alignment(1, 0, 0, 0);
        halign.Add(hbox);

        vbox.PackStart(halign, false, false, 3);

        Add(vbox);

        ShowAll();
    }


    public static void Main()
    {
        Application.Init();
        new SharpApp();
        Application.Run();
    }
}
在代码示例中,我们将两个按钮放置在窗口的右下角。为此,我们使用一个水平框和一个垂直框以及两个对齐容器。
Alignment valign = new Alignment(0, 1, 0, 0);
这将把子控件放在底部。
vbox.PackStart(valign);
在这里,我们将 Alignment 控件放置在垂直框中。
HBox hbox = new HBox(true, 3);
...
Button ok = new Button("OK");
ok.SetSizeRequest(70, 30);
Button close = new Button("Close");

hbox.Add(ok);
hbox.Add(close);
我们创建一个水平框并在其中放置两个按钮。
Alignment halign = new Alignment(1, 0, 0, 0);
halign.Add(hbox);

vbox.PackStart(halign, false, false, 3);
这将创建一个对齐容器,该容器将把其子控件放置在右侧。我们将水平框添加到对齐容器中,并将对齐容器打包到垂直框中。我们必须记住,对齐容器只接受一个子控件。这就是我们必须使用框的原因。
Table(表格)
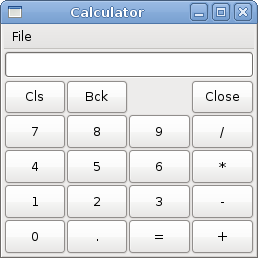
Table 控件将控件排列在行和列中。
using Gtk;
using System;

class SharpApp : Window {


    public SharpApp() : base("Calculator")
    {
        SetDefaultSize(250, 230);
        SetPosition(WindowPosition.Center);
        DeleteEvent += delegate { Application.Quit(); };

        VBox vbox = new VBox(false, 2);

        MenuBar mb = new MenuBar();
        Menu filemenu = new Menu();
        MenuItem file = new MenuItem("File");
        file.Submenu = filemenu;
        mb.Append(file);

        vbox.PackStart(mb, false, false, 0);

        Table table = new Table(5, 4, true);

        table.Attach(new Button("Cls"), 0, 1, 0, 1);
        table.Attach(new Button("Bck"), 1, 2, 0, 1);
        table.Attach(new Label(), 2, 3, 0, 1);
        table.Attach(new Button("Close"), 3, 4, 0, 1);

        table.Attach(new Button("7"), 0, 1, 1, 2);
        table.Attach(new Button("8"), 1, 2, 1, 2);
        table.Attach(new Button("9"), 2, 3, 1, 2);
        table.Attach(new Button("/"), 3, 4, 1, 2);

        table.Attach(new Button("4"), 0, 1, 2, 3);
        table.Attach(new Button("5"), 1, 2, 2, 3);
        table.Attach(new Button("6"), 2, 3, 2, 3);
        table.Attach(new Button("*"), 3, 4, 2, 3);

        table.Attach(new Button("1"), 0, 1, 3, 4);
        table.Attach(new Button("2"), 1, 2, 3, 4);
        table.Attach(new Button("3"), 2, 3, 3, 4);
        table.Attach(new Button("-"), 3, 4, 3, 4);

        table.Attach(new Button("0"), 0, 1, 4, 5);
        table.Attach(new Button("."), 1, 2, 4, 5);
        table.Attach(new Button("="), 2, 3, 4, 5);
        table.Attach(new Button("+"), 3, 4, 4, 5);

        vbox.PackStart(new Entry(), false, false, 0);
        vbox.PackEnd(table, true, true, 0);

        Add(vbox);
        ShowAll();
    }


    public static void Main()
    {
        Application.Init();
        new SharpApp();
        Application.Run();
    }
}
我们使用 Table 控件来创建一个计算器骨架。
Table table = new Table(5, 4, true);
我们创建一个有 5 行和 4 列的表格控件。第三个参数是 homogeneous(同质)参数。如果设置为 true,则表格中的所有控件大小相同。所有控件的大小都等于表格容器中最大的控件。
table.Attach(new Button("Cls"), 0, 1, 0, 1);
我们将一个按钮附加到表格容器。到表格的左上角的单元格。前两个参数是单元格的左侧和右侧,最后两个参数是单元格的顶部和左侧。
vbox.PackEnd(table, true, true, 0);
我们将表格控件打包到垂直框中。
Windows(窗口)
接下来我们创建一个更高级的例子。我们展示一个可以在 JDeveloper IDE 中找到的窗口。
using Gtk;
using System;

class SharpApp : Window {


    public SharpApp() : base("Windows")
    {
        SetDefaultSize(300, 250);
        SetPosition(WindowPosition.Center);
        BorderWidth = 15;
        DeleteEvent += delegate { Application.Quit(); };

        Table table = new Table(8, 4, false);
        table.ColumnSpacing = 3;

        Label title = new Label("Windows");

        Alignment halign = new Alignment(0, 0, 0, 0);
        halign.Add(title);

        table.Attach(halign, 0, 1, 0, 1, AttachOptions.Fill,
            AttachOptions.Fill, 0, 0);

        TextView wins = new TextView();
        wins.ModifyFg(StateType.Normal, new Gdk.Color(20, 20, 20));
        wins.CursorVisible = false;
        table.Attach(wins, 0, 2, 1, 3, AttachOptions.Fill | AttachOptions.Expand,
            AttachOptions.Fill | AttachOptions.Expand, 1, 1);

        Button activate = new Button("Activate");
        activate.SetSizeRequest(50, 30);
        table.Attach(activate, 3, 4, 1, 2, AttachOptions.Fill,
            AttachOptions.Shrink, 1, 1);

        Alignment valign = new Alignment(0, 0, 0, 0);
        Button close = new Button("Close");
        close.SetSizeRequest(70, 30);
        valign.Add(close);
        table.SetRowSpacing(1, 3);
        table.Attach(valign, 3, 4, 2, 3, AttachOptions.Fill,
            AttachOptions.Fill | AttachOptions.Expand, 1, 1);

        Alignment halign2 = new Alignment(0, 1, 0, 0);
        Button help = new Button("Help");
        help.SetSizeRequest(70, 30);
        halign2.Add(help);
        table.SetRowSpacing(3, 6);
        table.Attach(halign2, 0, 1, 4, 5, AttachOptions.Fill,
            AttachOptions.Fill, 0, 0);

        Button ok = new Button("OK");
        ok.SetSizeRequest(70, 30);
        table.Attach(ok, 3, 4, 4, 5, AttachOptions.Fill,
            AttachOptions.Fill, 0, 0);

        Add(table);
        ShowAll();
    }

    public static void Main()
    {
        Application.Init();
        new SharpApp();
        Application.Run();
    }
}
代码示例显示了我们如何在 GTK# 中创建一个类似的窗口。
Table table = new Table(8, 4, false);
table.ColumnSpacing = 3;
该示例基于 Table 容器。列之间将有 3 像素的空间。
Label title = new Label("Windows");

Alignment halign = new Alignment(0, 0, 0, 0);
halign.Add(title);

table.Attach(halign, 0, 1, 0, 1, AttachOptions.Fill,
    AttachOptions.Fill, 0, 0);
此代码创建一个左对齐的标签。标签放置在 Table 容器的第一行。
TextView wins = new TextView();
wins.ModifyFg(StateType.Normal, new Gdk.Color(20, 20, 20));
wins.CursorVisible = false;
table.Attach(wins, 0, 2, 1, 3, AttachOptions.Fill | AttachOptions.Expand,
    AttachOptions.Fill | AttachOptions.Expand, 1, 1);
文本视图控件跨越两行两列。我们使控件不可编辑并隐藏光标。
Alignment valign = new Alignment(0, 0, 0, 0);
Button close = new Button("Close");
close.SetSizeRequest(70, 30);
valign.Add(close);
table.SetRowSpacing(1, 3);
table.Attach(valign, 3, 4, 2, 3, AttachOptions.Fill,
    AttachOptions.Fill | AttachOptions.Expand, 1, 1);
我们将关闭按钮放在文本视图控件旁边,放在第四列。(我们从零开始计数)我们将按钮添加到对齐控件中,以便我们可以将其对齐到顶部。

在本章中,我们介绍了 GTK# 控件的布局管理。