GTK# 中的自定义小部件
最后修改于 2023 年 10 月 18 日
工具包通常只提供最常见的小部件,如按钮、文本小部件、滑块等。没有哪个工具包能提供所有可能的小部件。
更专业的小部件由客户端程序员创建。他们使用工具包提供的绘图工具来完成。有两种可能性:程序员可以修改或增强现有的部件,或者可以从头开始创建自定义部件。
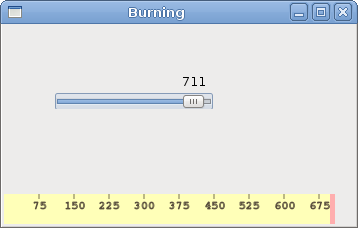
刻录部件
这是一个我们从头开始创建的小部件的例子。 可以在各种媒体刻录应用程序中找到此小部件,例如 Nero Burning ROM。
burning.cs
using Gtk;
using Cairo;
using System;

class Burning : DrawingArea
{

    string[] num = new string[] { "75", "150", "225", "300",
        "375", "450", "525", "600", "675" };

    public Burning() : base()
    {
        SetSizeRequest(-1, 30);
    }

    protected override bool OnExposeEvent(Gdk.EventExpose args)
    {

        Cairo.Context cr = Gdk.CairoHelper.Create(args.Window);
        cr.LineWidth = 0.8;

        cr.SelectFontFace("Courier 10 Pitch",
            FontSlant.Normal, FontWeight.Normal);
        cr.SetFontSize(11);

        int width = Allocation.Width;

        SharpApp parent = (SharpApp) GetAncestor (Gtk.Window.GType);
        int cur_width = parent.CurValue;

        int step = (int) Math.Round(width / 10.0);

        int till = (int) ((width / 750.0) * cur_width);
        int full = (int) ((width / 750.0) * 700);

        if (cur_width >= 700) {

            cr.SetSourceRGB(1.0, 1.0, 0.72);
            cr.Rectangle(0, 0, full, 30);
            cr.Clip();
            cr.Paint();
            cr.ResetClip();

            cr.SetSourceRGB(1.0, 0.68, 0.68);
            cr.Rectangle(full, 0, till-full, 30);
            cr.Clip();
            cr.Paint();
            cr.ResetClip();

        } else {

            cr.SetSourceRGB(1.0, 1.0, 0.72);
            cr.Rectangle(0, 0, till, 30);
            cr.Clip();
            cr.Paint();
            cr.ResetClip();
       }

       cr.SetSourceRGB(0.35, 0.31, 0.24);

       for (int i=1; i<=num.Length; i++) {

           cr.MoveTo(i*step, 0);
           cr.LineTo(i*step, 5);
           cr.Stroke();

           TextExtents extents = cr.TextExtents(num[i-1]);
           cr.MoveTo(i*step-extents.Width/2, 15);
           cr.TextPath(num[i-1]);
           cr.Stroke();
       }

        ((IDisposable) cr.Target).Dispose();
        ((IDisposable) cr).Dispose();

        return true;
    }
}


class SharpApp : Window {

    int cur_value = 0;
    Burning burning;

    public SharpApp() : base("Burning")
    {
        SetDefaultSize(350, 200);
        SetPosition(WindowPosition.Center);
        DeleteEvent += delegate { Application.Quit(); };

        VBox vbox = new VBox(false, 2);

        HScale scale = new HScale(0, 750, 1);
        scale.SetSizeRequest(160, 35);
        scale.ValueChanged += OnChanged;

        Fixed fix = new Fixed();
        fix.Put(scale, 50, 50);

        vbox.PackStart(fix);

        burning = new Burning();
        vbox.PackStart(burning, false, false, 0);

        Add(vbox);

        ShowAll();
    }

    void OnChanged(object sender, EventArgs args)
    {
        Scale scale = (Scale) sender;
        cur_value = (int) scale.Value;
        burning.QueueDraw();
    }

    public int CurValue {
        get { return cur_value; }
    }


    public static void Main()
    {
        Application.Init();
        new SharpApp();
        Application.Run();
    }
}
我们将一个DrawingArea放在窗口的底部,并手动绘制整个小部件。所有重要的代码都位于 Burning 类的 OnExposeEvent 方法中。此小部件以图形方式显示介质的总容量和可供我们使用的可用空间。该小部件由一个 scale 小部件控制。我们自定义小部件的最小值为 0,最大值为 750。如果我们达到 700 的值,我们开始用红色绘制。 这通常表示过度刻录。
string[] num = new string[] { "75", "150", "225", "300",
    "375", "450", "525", "600", "675" };
这些数字显示在刻录小部件上。它们显示了介质的容量。
SharpApp parent = (SharpApp) GetAncestor (Gtk.Window.GType);
int cur_width = parent.CurValue;
这两行从 scale 小部件获取当前数字。我们获取父小部件,并从父小部件获取当前值。
int till = (int) ((width / 750.0) * cur_width);
int full = (int) ((width / 750.0) * 700);
till 参数确定要绘制的总大小。 此值来自滑块小部件。它是整个区域的一部分。 full 参数确定我们开始用红色绘制的点。
cr.SetSourceRGB(1.0, 1.0, 0.72);
cr.Rectangle(0, 0, full, 30);
cr.Clip();
cr.Paint();
cr.ResetClip();
这里的这段代码绘制一个黄色矩形,直到介质已满。
TextExtents extents = cr.TextExtents(num[i-1]);
cr.MoveTo(i*step-extents.Width/2, 15);
cr.TextPath(num[i-1]);
cr.Stroke();
这里的这段代码在刻录小部件上绘制数字。我们计算 TextExtents 以正确地定位文本。
void OnChanged(object sender, EventArgs args)
{
    Scale scale = (Scale) sender;
    cur_value = (int) scale.Value;
    burning.QueueDraw();
}
我们从 scale 小部件获取值,将其存储在 cur_value 变量中供以后使用。我们重新绘制刻录小部件。
在本章中,我们在 GTK# 中创建了一个自定义小部件。