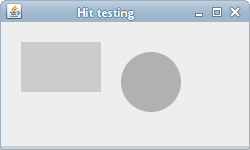
命中测试,移动对象
最后修改于 2023 年 7 月 17 日
在本部分 Java 2D 编程教程中,我们首先讨论命中测试。我们演示了如何在面板上的形状内确定是否单击了。在第二个示例中,我们创建了两个形状,可以使用鼠标在面板上移动它们,并使用鼠标滚轮调整它们的大小。在最后一个示例中,我们将使用两个控制点来调整矩形的大小。
命中测试
命中测试是确定鼠标指针是否在 `Shape` 内部单击。每个 `Shape` 都有一个 `contains` 方法。该方法测试指定的 `Point2D` 是否在 `Shape` 的边界内。
package com.zetcode;

import java.awt.AlphaComposite;
import java.awt.Color;
import java.awt.EventQueue;
import java.awt.Graphics;
import java.awt.Graphics2D;
import java.awt.RenderingHints;
import java.awt.event.MouseAdapter;
import java.awt.event.MouseEvent;
import java.awt.geom.Ellipse2D;
import java.awt.geom.Rectangle2D;
import java.util.logging.Level;
import java.util.logging.Logger;
import javax.swing.JFrame;
import javax.swing.JPanel;

class Surface extends JPanel {

    private Rectangle2D rect;
    private Ellipse2D ellipse;
    private float alpha_rectangle;
    private float alpha_ellipse;

    public Surface() {

        initSurface();
    }

    private void initSurface() {

        addMouseListener(new HitTestAdapter());

        rect = new Rectangle2D.Float(20f, 20f, 80f, 50f);
        ellipse = new Ellipse2D.Float(120f, 30f, 60f, 60f);

        alpha_rectangle = 1f;
        alpha_ellipse = 1f;
    }

    private void doDrawing(Graphics g) {

        Graphics2D g2d = (Graphics2D) g.create();

        g2d.setPaint(new Color(50, 50, 50));

        RenderingHints rh = new RenderingHints(RenderingHints.KEY_ANTIALIASING,
                RenderingHints.VALUE_ANTIALIAS_ON);

        rh.put(RenderingHints.KEY_RENDERING,
                RenderingHints.VALUE_RENDER_QUALITY);

        g2d.setRenderingHints(rh);

        g2d.setComposite(AlphaComposite.getInstance(AlphaComposite.SRC_OVER,
                alpha_rectangle));
        g2d.fill(rect);

        g2d.setComposite(AlphaComposite.getInstance(AlphaComposite.SRC_OVER,
                alpha_ellipse));
        g2d.fill(ellipse);

        g2d.dispose();
    }

    @Override
    public void paintComponent(Graphics g) {

        super.paintComponent(g);
        doDrawing(g);
    }

    class RectRunnable implements Runnable {

        private Thread runner;

        public RectRunnable() {

            initThread();
        }

        private void initThread() {

            runner = new Thread(this);
            runner.start();
        }

        @Override
        public void run() {

            while (alpha_rectangle >= 0) {

                repaint();
                alpha_rectangle += -0.01f;

                if (alpha_rectangle < 0) {
                    alpha_rectangle = 0;
                }

                try {

                    Thread.sleep(50);
                } catch (InterruptedException ex) {

                     Logger.getLogger(Surface.class.getName()).log(Level.SEVERE,
                             null, ex);
                }
            }
        }
    }

    class HitTestAdapter extends MouseAdapter
            implements Runnable {

        private RectRunnable rectAnimator;
        private Thread ellipseAnimator;

        @Override
        public void mousePressed(MouseEvent e) {

            int x = e.getX();
            int y = e.getY();

            if (rect.contains(x, y)) {

                rectAnimator = new RectRunnable();
            }

            if (ellipse.contains(x, y)) {

                ellipseAnimator = new Thread(this);
                ellipseAnimator.start();
            }
        }

        @Override
        public void run() {

            while (alpha_ellipse >= 0) {

                repaint();
                alpha_ellipse += -0.01f;

                if (alpha_ellipse < 0) {

                    alpha_ellipse = 0;
                }

                try {

                    Thread.sleep(50);
                } catch (InterruptedException ex) {

                    Logger.getLogger(Surface.class.getName()).log(Level.SEVERE,
                        null, ex);
                }
            }
        }
    }
}

public class HitTestingEx extends JFrame {

    public HitTestingEx() {

        add(new Surface());

        setTitle("Hit testing");
        setSize(250, 150);
        setDefaultCloseOperation(JFrame.EXIT_ON_CLOSE);
        setLocationRelativeTo(null);
    }

    public static void main(String[] args) {

        EventQueue.invokeLater(new Runnable() {

            @Override
            public void run() {
                HitTestingEx ex = new HitTestingEx();
                ex.setVisible(true);
            }
        });
    }
}
在我们的示例中,我们有两个 `Shapes`:一个矩形和一个圆形。通过点击它们,它们会逐渐消失。在此示例中,我们使用线程。
private Rectangle2D rect;
private Ellipse2D ellipse;
我们使用一个矩形和一个椭圆。
private float alpha_rectangle;
private float alpha_ellipse;
这两个变量控制两个几何对象的透明度。
g2d.setComposite(AlphaComposite.getInstance(AlphaComposite.SRC_OVER,
                                            alpha_rectangle));
g2d.fill(rect);
在 `doDrawing` 方法中,我们设置了矩形的透明度。`alpha_rectangle` 是在一个专用的 `Thread` 中计算的。
`HitTestAdapter` 类负责处理鼠标事件。它实现了 `Runnable` 接口,这意味着它还创建了第一个线程。
if (ellipse.contains(x, y)) {

    ellipseAnimator = new Thread(this);
    ellipseAnimator.start();
}
如果我们单击椭圆内部,将创建一个新的 `Thread`。该线程调用 `run` 方法。在我们的例子中,它就是类本身(`HitTestAdapter`)的 `run` 方法。
if (rect.contains(x, y)) {

    rectAnimator = new RectRunnable();
}
对于矩形,我们有一个单独的内部类——`RectRunnable` 类。此类在其构造函数中创建自己的线程。
public void run() {

    while (alpha_ellipse >= 0) {

        repaint();
        alpha_ellipse += -0.01f;
        ...
    }
请注意,`run` 方法只调用一次。要实际执行操作,我们必须实现一个 `while` 循环。`while` 循环会重绘面板并递减 `alpha_ellipse` 变量。
移动和缩放
在下一节中,我们将学习如何在面板上使用鼠标移动和缩放图形对象。它可以用于移动和缩放图表、示意图或其他各种应用程序对象。
package com.zetcode;

import java.awt.Color;
import java.awt.EventQueue;
import java.awt.Font;
import java.awt.Graphics;
import java.awt.Graphics2D;
import java.awt.RenderingHints;
import java.awt.event.MouseAdapter;
import java.awt.event.MouseEvent;
import java.awt.event.MouseWheelEvent;
import java.awt.event.MouseWheelListener;
import java.awt.geom.Ellipse2D;
import java.awt.geom.Rectangle2D;
import javax.swing.JFrame;
import javax.swing.JPanel;


class Surface extends JPanel {

    private ZRectangle zrect;
    private ZEllipse zell;

    public Surface() {

        initUI();
    }

    private void initUI() {

        MovingAdapter ma = new MovingAdapter();

        addMouseMotionListener(ma);
        addMouseListener(ma);
        addMouseWheelListener(new ScaleHandler());

        zrect = new ZRectangle(50, 50, 50, 50);
        zell = new ZEllipse(150, 70, 80, 80);
    }

    private void doDrawing(Graphics g) {

        Graphics2D g2d = (Graphics2D) g;

        Font font = new Font("Serif", Font.BOLD, 40);
        g2d.setFont(font);

        g2d.setRenderingHint(RenderingHints.KEY_ANTIALIASING,
                        RenderingHints.VALUE_ANTIALIAS_ON);
        g2d.setRenderingHint(RenderingHints.KEY_TEXT_ANTIALIASING,
                        RenderingHints.VALUE_TEXT_ANTIALIAS_ON);

        g2d.setPaint(new Color(0, 0, 200));
        g2d.fill(zrect);
        g2d.setPaint(new Color(0, 200, 0));
        g2d.fill(zell);
    }

    @Override
    public void paintComponent(Graphics g) {
        super.paintComponent(g);

        doDrawing(g);
    }

    class ZEllipse extends Ellipse2D.Float {

        public ZEllipse(float x, float y, float width, float height) {

            setFrame(x, y, width, height);
        }

        public boolean isHit(float x, float y) {

            return getBounds2D().contains(x, y);
        }

        public void addX(float x) {

            this.x += x;
        }

        public void addY(float y) {

            this.y += y;
        }

        public void addWidth(float w) {

            this.width += w;
        }

        public void addHeight(float h) {

            this.height += h;
        }
    }

    class ZRectangle extends Rectangle2D.Float {

        public ZRectangle(float x, float y, float width, float height) {

            setRect(x, y, width, height);
        }

        public boolean isHit(float x, float y) {

            return getBounds2D().contains(x, y);
        }

        public void addX(float x) {

            this.x += x;
        }

        public void addY(float y) {

            this.y += y;
        }

        public void addWidth(float w) {

            this.width += w;
        }

        public void addHeight(float h) {

            this.height += h;
        }
    }

    class MovingAdapter extends MouseAdapter {

        private int x;
        private int y;

        @Override
        public void mousePressed(MouseEvent e) {

            x = e.getX();
            y = e.getY();
        }

        @Override
        public void mouseDragged(MouseEvent e) {

            doMove(e);
        }

        private void doMove(MouseEvent e) {

            int dx = e.getX() - x;
            int dy = e.getY() - y;

            if (zrect.isHit(x, y)) {

                zrect.addX(dx);
                zrect.addY(dy);
                repaint();
            }

            if (zell.isHit(x, y)) {

                zell.addX(dx);
                zell.addY(dy);
                repaint();
            }

            x += dx;
            y += dy;
        }
    }

    class ScaleHandler implements MouseWheelListener {

        @Override
        public void mouseWheelMoved(MouseWheelEvent e) {

            doScale(e);
        }

        private void doScale(MouseWheelEvent e) {

            int x = e.getX();
            int y = e.getY();

            if (e.getScrollType() == MouseWheelEvent.WHEEL_UNIT_SCROLL) {

                if (zrect.isHit(x, y)) {

                    float amount =  e.getWheelRotation() * 5f;
                    zrect.addWidth(amount);
                    zrect.addHeight(amount);
                    repaint();
                }

                if (zell.isHit(x, y)) {

                    float amount =  e.getWheelRotation() * 5f;
                    zell.addWidth(amount);
                    zell.addHeight(amount);
                    repaint();
                }
            }
        }
    }
}

public class MovingScalingEx extends JFrame {

    public MovingScalingEx() {

        initUI();
    }

    private void initUI() {

        add(new Surface());

        setTitle("Moving and scaling");
        setSize(300, 300);
        setDefaultCloseOperation(JFrame.EXIT_ON_CLOSE);
        setLocationRelativeTo(null);
    }

    public static void main(String[] args) {

        EventQueue.invokeLater(new Runnable() {

            @Override
            public void run() {
                MovingScalingEx ex = new MovingScalingEx();
                ex.setVisible(true);
            }
        });
    }
}
在我们的代码示例中,我们有两个图形对象:一个矩形和一个圆形。我们可以通过单击它们并拖动来移动它们。我们还可以通过将鼠标光标定位在对象上并滚动鼠标滚轮来放大或缩小它们。
private ZRectangle zrect;
private ZEllipse zell;
如前所述,我们的面板上有一个矩形和一个椭圆。这两个类都扩展了 Java AWT 包中的内置类的功能。
addMouseMotionListener(ma);
addMouseListener(ma);
addMouseWheelListener(new ScaleHandler());
我们注册了三个监听器。这些监听器会捕获鼠标按下、鼠标拖动和鼠标滚轮事件。
class ZEllipse extends Ellipse2D.Float {

    public ZEllipse(float x, float y, float width, float height) {

        setFrame(x, y, width, height);
    }

    public boolean isHit(float x, float y) {

        return getBounds2D().contains(x, y);
    }
...
}
此代码片段显示了一个 `ZEllipse` 类。它扩展了内置的 `Ellipse2D.Float` 类。它增加了椭圆的缩放和移动功能。例如,`isHit` 方法确定鼠标指针是否在椭圆区域内。
`MovingAdapter` 类处理鼠标按下和鼠标拖动事件。
@Override
public void mousePressed(MouseEvent e) {

    x = e.getX();
    y = e.getY();
}
在 `mousePressed` 方法中,我们存储了对象的初始 x 和 y 坐标。
int dx = e.getX() - x;
int dy = e.getY() - y;
在 `doMove` 方法中,我们计算了对象被拖动的距离。
if (zrect.isHit(x, y)) {

    zrect.addX(dx);
    zrect.addY(dy);
    repaint();
}
如果我们在矩形区域内,我们会更新矩形的 x 和 y 坐标并重绘面板。
x += dx;
y += dy;
初始坐标已更新。
`ScaleHandler` 类处理对象的缩放。
if (e.getScrollType() == MouseWheelEvent.WHEEL_UNIT_SCROLL) {

    if (zrect.isHit(x, y)) {

        float amount =  e.getWheelRotation() * 5f;
        zrect.addWidth(amount);
        zrect.addHeight(amount);
        repaint();
    }
...
}
如果我们滚动鼠标滚轮并且光标在矩形区域内,则会调整矩形的大小并重绘面板。缩放量是从 `getWheelRotation` 方法计算的,该方法返回滚轮滚动的量。
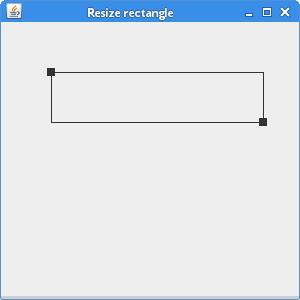
调整矩形大小
在下一个示例中,我们将演示如何调整形状的大小。我们的形状是一个矩形。在矩形上,我们绘制了两个小的黑色矩形。通过单击这些小矩形并拖动它们,我们可以调整主矩形的大小。
package com.zetcode;

import java.awt.EventQueue;
import java.awt.Graphics;
import java.awt.Graphics2D;
import java.awt.Point;
import java.awt.event.MouseAdapter;
import java.awt.event.MouseEvent;
import java.awt.geom.Point2D;
import java.awt.geom.Rectangle2D;
import javax.swing.JFrame;
import javax.swing.JPanel;

class Surface extends JPanel {

    private Point2D[] points;
    private final int SIZE = 8;
    private int pos;

    public Surface() {

        initUI();
    }

    private void initUI() {

        addMouseListener(new ShapeTestAdapter());
        addMouseMotionListener(new ShapeTestAdapter());
        pos = -1;

        points = new Point2D[2];
        points[0] = new Point2D.Double(50, 50);
        points[1] = new Point2D.Double(150, 100);
    }

    private void doDrawing(Graphics g) {

        Graphics2D g2 = (Graphics2D) g;

        for (Point2D point : points) {
            double x = point.getX() - SIZE / 2;
            double y = point.getY() - SIZE / 2;
            g2.fill(new Rectangle2D.Double(x, y, SIZE, SIZE));
        }

        Rectangle2D r = new Rectangle2D.Double();
        r.setFrameFromDiagonal(points[0], points[1]);

        g2.draw(r);
    }

    @Override
    public void paintComponent(Graphics g) {
        super.paintComponent(g);

        doDrawing(g);
    }

    private class ShapeTestAdapter extends MouseAdapter {

        @Override
        public void mousePressed(MouseEvent event) {

            Point p = event.getPoint();

            for (int i = 0; i < points.length; i++) {

                double x = points[i].getX() - SIZE / 2;
                double y = points[i].getY() - SIZE / 2;

                Rectangle2D r = new Rectangle2D.Double(x, y, SIZE, SIZE);

                if (r.contains(p)) {

                    pos = i;
                    return;
                }
            }
        }

        @Override
        public void mouseReleased(MouseEvent event) {

            pos = -1;
        }

        @Override
        public void mouseDragged(MouseEvent event) {

            if (pos == -1) {
                return;
            }

            points[pos] = event.getPoint();
            repaint();
        }
    }
}

public class ResizingRectangleEx extends JFrame {

    public ResizingRectangleEx()  {

        initUI();
    }

    private void initUI() {

        add(new Surface());

        setTitle("Resize rectangle");
        setSize(300, 300);
        setDefaultCloseOperation(JFrame.EXIT_ON_CLOSE);
        setLocationRelativeTo(null);
    }

    public static void main(String[] args) {

        EventQueue.invokeLater(new Runnable() {

            @Override
            public void run() {
                ResizingRectangleEx ex = new ResizingRectangleEx();
                ex.setVisible(true);
            }
        });
    }
}
创建矩形有两种方法。一种方法是提供左上角的 x 和 y 坐标以及矩形的宽度和高度。另一种方法是提供左上角和右下角。在我们的代码示例中,我们同时使用了这两种方法。
private Point2D[] points;
在此数组中,我们存储了构成我们矩形的点。
private final int SIZE = 8;
这是小黑色矩形的大小。
points = new Point2D[2];
points[0] = new Point2D.Double(50, 50);
points[1] = new Point2D.Double(150, 100);
这些是矩形的初始坐标。
for (int i = 0; i < points.length; i++) {

    double x = points[i].getX() - SIZE / 2;
    double y = points[i].getY() - SIZE / 2;
    g2.fill(new Rectangle2D.Double(x, y, SIZE, SIZE));
}
此代码绘制了两个小的控制矩形。
Rectangle2D s = new Rectangle2D.Double();
s.setFrameFromDiagonal(points[0], points[1]);

g2.draw(s);
这里我们根据点绘制矩形。
@Override
public void mousePressed(MouseEvent event) {

    Point p = event.getPoint();

    for (int i = 0; i < points.length; i++) {

        double x = points[i].getX() - SIZE / 2;
        double y = points[i].getY() - SIZE / 2;

        Rectangle2D r = new Rectangle2D.Double(x, y, SIZE, SIZE);

        if (r.contains(p)) {

            pos = i;
            return;
        }
    }
}
在 `mousePressed` 方法中,我们确定是否单击了两个控制点之一。如果我们击中了其中一个,`pos` 变量将存储是哪一个。
@Override
public void mouseDragged(MouseEvent event) {

    if (pos == -1) {
        return;
    }

    points[pos] = event.getPoint();
    repaint();
}
这里矩形被动态调整大小。在 `mouseDragged` 事件期间,我们获取当前点,更新我们的点数组,并重绘面板。
在本部分 Java 2D 教程中,我们涵盖了命中测试和移动对象。